Tuesday, May 31, 2011

Ben 10: the OMNITRIX

My first born has rediscovered his love of the Ben 10 cartoon (NOT Ben 10: Alien Force, but the original, he's quick to point out). A few years back in Colorado, his bestie and he often pretended they were Fourarms or Diamondhead or XLR8 or Upgrade or...whatever the other six are. And then he got his very own Omnitrix. It was very cool. It had a dot matrix screen with games that he would play and made all sorts of sounds. But somewhere in the move, the watch got lost. We did a little research online and for a pretty penny he could once again own an Omnitrix like the one he had.


After the discovery that purchasing a new omnitrix was out of his budget he posed a question to me: "Could you make me a crocheted one, Mom?" I thought of how the watch was all sleek and electric and I reminded him that even if I could make one, it wouldn't be as "cool" as the original. He thought about that and decided that even though it wouldn't make sounds or move, it would be worth it. I told him I'd think it though.


Always eager for a new challenge, I took this one on in secret, just in case it didn't work out. I thought that the watch band would be simple enough, but creating the watch face may be tricky. After a few prototypes, I settled on a style I thought would work best.


I had the 2 pieces figured out but I wanted to make it really "work." Ben twists the watch face and then slams down on it to make him change into an alien. I know crochet isn't known for it's movable parts, but I thought a low tech version of a rotating face could be easily achieved by adding two small risers under the face and threading some matching yarn through the face, risers, and onto the underside of the band (not too tightly).


I admit, I was pleased with the results.

But would my boy think it was okay? Yes, yes he did!


The side-by-side comparison


You can see that I should have made the watch band thicker. I did adjust this in the next two I made because, of course, sister and brother needed one, too (the pattern I'll post below has the thicker band)

So here it is: Ben 10's Crocheted Omnitrix

WW yarn in Lime, grey, black, white
Size F Hook
Embroidery needle, thread
1-Large Black Button, 1-lime or yellow bead, 4-lime or yellow sequins

Watch Band (in Black)
Unless otherwise noted, always ch 1 before the turn at the end of a row and insert into second ch from hook upon starting a new row
Ch 7
R1: 6 sc, ch 2
R2: 7 sc, ch 2
R3: 8 sc
R4 - R30: 8 sc **this part can be adjusted smaller/bigger to fit wrist by adding or subtracting rows**
Beginning large button hole...
R31: 4 sc, ch 1, turn
R32: 4 sc, ch 1, turn
R33: 4 sc, ch 1, turn
R34: 4 sc, ch 1, turn
R35: 4 sc, F.O.
Go back to R30 and attach black yarn onto short side and work up as a matching side...
R31: 4 sc, ch 1, turn
R32: 4 sc, ch 1, turn
R33: 4 sc, ch 1, turn
R34: 4 sc, ch 1, turn
R35: 4 sc
          (Optional reinforce button hole row: sl st 10 up and down inside of button hole, F.O.)
Attach black yarn to start R36 and connect R35 halves as the top of a button hole...
R36: 8 sc
R37: 8 sc, turn with no ch 1
R38: 6 sc, sl st into last st
sl st around perimeter of watch

In WHITE
Top stitch into the fp of first st of each row and F.O.
Top stitch into the fb of last st of each row and F.O.
This should make 2 parallel white lines up and down the length of the watch band

Omnitrix Watch Face (start with Lime)
I will indicate each ch and row turn on this section just for added clarification This section starts with the lime hourglass shape
Ch 7, turn
R1: sc across (6), ch 1, turn
R2: sk first st, sc across (6), turn
R3: sk first st, sc across (5), turn
R4: sk first st, sc across (4), turn
R5: sk first st, sc across (3), turn
R6: sk first st, sc across (2), turn
R7: sk first st, sc across (1), ch 2, turn
R8: (insert into second ch from hook) 1 sc, ch 2, turn
R9: (insert into second ch from hook) 2 sc, ch 2, turn
R10: (insert into second ch from hook) 3 sc, ch 2, turn
R11: (insert into second ch from hook) 4 sc, ch 2, turn
R12: (insert into second ch from hook) 5 sc, ch 2, turn
R13: (insert into second ch from hook) 6 sc, ch 1, turn
R14: (insert into second ch from hook) 6 sl st
Draw up grey yarn through the lime loop left on hook. Turn hourglass on it's side and begin working evenly into the row sides
greyR1: sk first row, 9 sc (four down one side, one at the thinnest point of the hourglass and four up the other side), sk last row, ch 1
greyR2: sk first st, sc, dc, htr, tr, htr, dc, sc, sk last st, sl st into that first grey connecting st
Repeat these two rows on the other side of the hourglass, stretching it to take a circular shape as you go
blackRnd1: Attach black anywhere on the circumference and sc evenly around.

Highlight hourglass by using needle and yarn to outline the hourglass with black yarn.

Add 4 sequins at 12 o'clock, 3 o'clock, 6 o'clock and 9 o'clock with sewing thread and needle.


Risers (make 2 in black)
Magic Circle (6)
Rnd 1: 2 sc in ea st (12)
Rnd 2: *2 sc in next st, sc* around (18)
F.O. and leave long tail of yarn

Whip stitch together and secure to the middle of watch. With a piece of lime yarn, thread the omnitrix face through the center of the hourglass, down through the risers and watch band and gently secure on the underside of band. The tension on this shouldn't be too tight so the face can be turned for "realistic" play :)

Once the face is attached, sew the bead onto the band just under the edge of the omnitrix (at 6 o'clock). When the watch is on a wrist, it will show.

Add the large black button to the side of watch opposite the button hole. The yarn will stretch a bit, so make it nice and snug to start with.


Action Shot

Friday, May 27, 2011

Pink Flower

My little Ballerina had her first recital this spring! She was the most graceful one in her class. No, I'm not biased. Well, okay, a little. But she *was* a perfect vision in  pink  that night!

I thought my tiny dancer needed to feel like a ballerina from head to toe. Leotard...pink! Tutu...pink! Toes...painted pink! But she needed a little  pink  to adorn her lovely ballerina bun.

photography courtesy of www.timdenison.com
 I have never before worked with crochet 10 thread (and the itty bitty crochet hook that goes with). I think I dried out my contacts for not blinking as I worked on this, but it was worth it! We pinned the flower atop her bun with bobby pins and it actually stayed on for the entire recital :)

Kari's Ponderings...Next year when all 3 kiddos are in full day school I'm thinking I may have the time to bust out some more of these darling hair frou frous for my future etsy store. I think they could appeal to little girls and big girls alike! I know I like to mix fancy with the everyday when I dress so I have sported the frou frou in my hair with a sage button-up, pair a jeans and my gold flats.  I think they'd be well received on a handmade site. What crocheted items would you be tempted to buy on etsy?

Tuesday, May 24, 2011

Boo Gets a Promotion

Of all the Super Mario Bros characters, my daughter seems to have a special place in her heart for the villans. My daughter is sweet as can be and adores animals, so the thought of a mean old plumber attacking turtle-esque creatures seemed inhumane (even if the dragon-y Bowser did capture the princess...she simply has more compassion for the animals than the spoiled princesses of the world). She also was attached to the flying Boos. These round ghosties are quite shy and if you look at them they will cover their eyes and stay put. But turn your back on them for one moment and they'll quickly sneak up on you! They may not be an animal, but really, they are kind of adorable.

So for Christmas she got a Boo. Using wolfdreamer's clever pattern, I made him in a super soft acrylic white yarn and he was squishy and snuggly. I had used sticky backed felt for the eyes and the mouth was sort of a disaster of red yarn I tried to fashion into a mouth.
Boo as he was first made


At first he got played with often, but it wasn't long before the eyes would fall off and even though I'd stick some new ones on they too would fall off and eventually he got played with less and less. Yesterday I found Boo stuffed into a corner of the bed, forgotten, eyes missing and I thought to myself ...  
Boo needs a promotion.


My first improvement was to give Boo some proper eyes. I have found that sticky-backed felt is NOT  a great invention for a toy that actually gets played with. So I busted out the normal black and white felt and sewed on some eyes that should stay put.


Next, I dealt with his mouth. I make no exaggeration when I say I am not a perfectionist when it comes to embroidery. My hand stitching always turns out for the best if it's on the underside of something you'll never see. Now, I can get the job done, but...it's not pretty. Thus Boo's first mouth. So, it was back to the felt pack to make this better. I didn't even bother with taking out the red yarn, but rather cut out the mouth and teeth and secured them to hide my first attempt. I decided to not make the extra long tongue, and instead sewed the teeth onto Boos old mouth and left the red part of the mouth to hang down in a tongue-like fashion.

Now Boo had had to put up with a lot, so I made his promotion complete when I introduced him into royalty with a proper crown. Small diamond shaped blue felt was sewn on as jewels and....

King Boo
his transformation is complete! He's a lot more "put together" (as a king should be) and should be able to withstand some more love and play from his adoring playmate!

Sunday, May 22, 2011

Chain Chomp Hat

I had a brilliant idea to crochet something Super Mario Bros related for each of my children this Christmas. There are some GREAT patterns and inspiration out there but I was still fairly green at this crochet thing and the amazing patterns like wolfdreamer's Mario and Luigi  seemed a bit out of my league. So after much deliberation I settled on the Chain Chomp Hat for my eldest. I figured it could get double use as a toy and keep his ears warm through the winter.

My inspiration for this project was based entirely on fashiondiva's creation at Cut Out + Keep found here. I dug around for cute & easy crocheted beanie and decided to follow this pattern but kept the rounds going amigurumi style instead of joining as suggested.

*4 dc into one st, sk, sl st, sk* repeat for scalloping


To the beanie pattern I added a scallop edging in white for teeth front and back. I fastened white sc chains made into loops as eyes.


back of hat has teeth, too

Grey sc chains made into loops attached at the tippy top are his chain (gotta have one broken chain at the end to show that he's OFF HIS CHAIN - WATCH OUT!)


It turned out a bit big for a 9-year-old head but did get some use and perhaps his brains will grow into it in the coming years.


 Thanks to my adorable model you can see just how large it turned out with a G hook and WW yarn.

I'll post the my other Nintendo Super Mario Bros crocheted projects soon!

Thursday, May 19, 2011

International Yarn Bombing Day - June 11th

Calling all Fiber Artists!! Want to be a part of history and contribute to the first ever International Yarn Bombing Day on June 11th? You know you wanna! Check out YarnBombing to get more information on yarn bomb sites being planned near you (or designate one for your city!).

I am happy to report that there is an approved site for June 11th in my neck of the woods:
Portland, OR . Check it...

Celebrate Intl' Yarn Bombing Day Sat, June 11 by yarn bombing Director Park in Portland, OR (www.DirectorPark.org). It's Rose Festival's Grand Floral Parade day so floral patterns encouraged. Recommended fixtures include silver pillars (40.5" circum, 22" high), light posts in park (16" circum), bike racks (4.75" circum), white pillars (40.5 " circum). Please, no tree yarn bombs. This is an approved site. 
~Taken from the International Yarn Bombing Day facebook page
 I am in love with the idea of beautifying our area with spontaneous yarn as previously mentioned here so as soon as I saw this my mind began racing with just what I could contribute! I'm already starting to whip up some roses to adorn a lucky light post. But I don't want to spoil the surprise, so here's just a GLIMPSE. 
 

Wednesday, May 18, 2011

Yarn Bombing in Bainbridge

One of my favorite recent pastimes (can a pastime be recent? hmmm...) is photo bombing. I have been successful 2 times at sticking my face into a picture not meant to be taken of me. Once was a few years ago in Seattle at a Mariner's game with my co-bomber Laura. The second was at a Dave Matthews Band Concert in 2011 at the Gorge in George, WA. It's definitely a rush when you've committed to the bomb and then walk away as if you did nothing out of the ordinary (and hope that they don't notice until you are out of sight!).  I laugh to think of them checking the digital view finder after taking the picture and notice a smiling face they don't know. HAHHAHAHA!

So YARN bombing has a somewhat similar idea behind it: secretly putting some yarn creation up where it isn't expected to be, all in good fun. But in yarn bombing the specific idea is to creatively & secretly beautify an area with yarn or other fiber creations.

On a recent trip to Bainbridge Island in Washington state, I was able to see a yarn bomb first hand. As a crochet nut, I can tell you that I was particularly giddy to see this "sock" adorning a sign post:
How warm and cozy this once cold metal sign post looked on a blustery day in early April! Not only is it fascinating to see such an abnormally long "sock" on a pole, but all the various hues excite my craze with colors.

It may not be such a shock to find out that this sign was on the corner next to a shopping strip in Bainbridge where this lovely store was located:
ChurchMouse Yarns & Teas is as darling inside as it is outside. I wanted to go through and touch EVERYTHING! The projects they had inside were nearly all knitting work and beautifully arranged to, again, play on my love of colors:
photos courtesy of Tim Denison Photography
Vancouver, WA doesn't have a specialty yarn store, but I know that Portland, OR does so I will be visiting those SOON because the warmth and atmosphere that yarn stores have is much more alluring than the rather sterile feel of Michaels and JoAnns. And of course there's no comparison as far as selection goes. The ChurchMouse boasts of having several goodies to fancy a person's love for tea and sure enough there were darling chinas and teas scattered among the fuzzy fibers and soft silks.

So if you ever are in Seattle and looking for a charming, out-of-the-way yarn shop that deserves your patronage, just hop on the 35 minute ferry to Bainbridge Island and go explore this lovely little yarn shop (you'll know you are close when you see the sign post cozy :)

Monday, May 16, 2011

Apples & Teacher Appreciation Banner

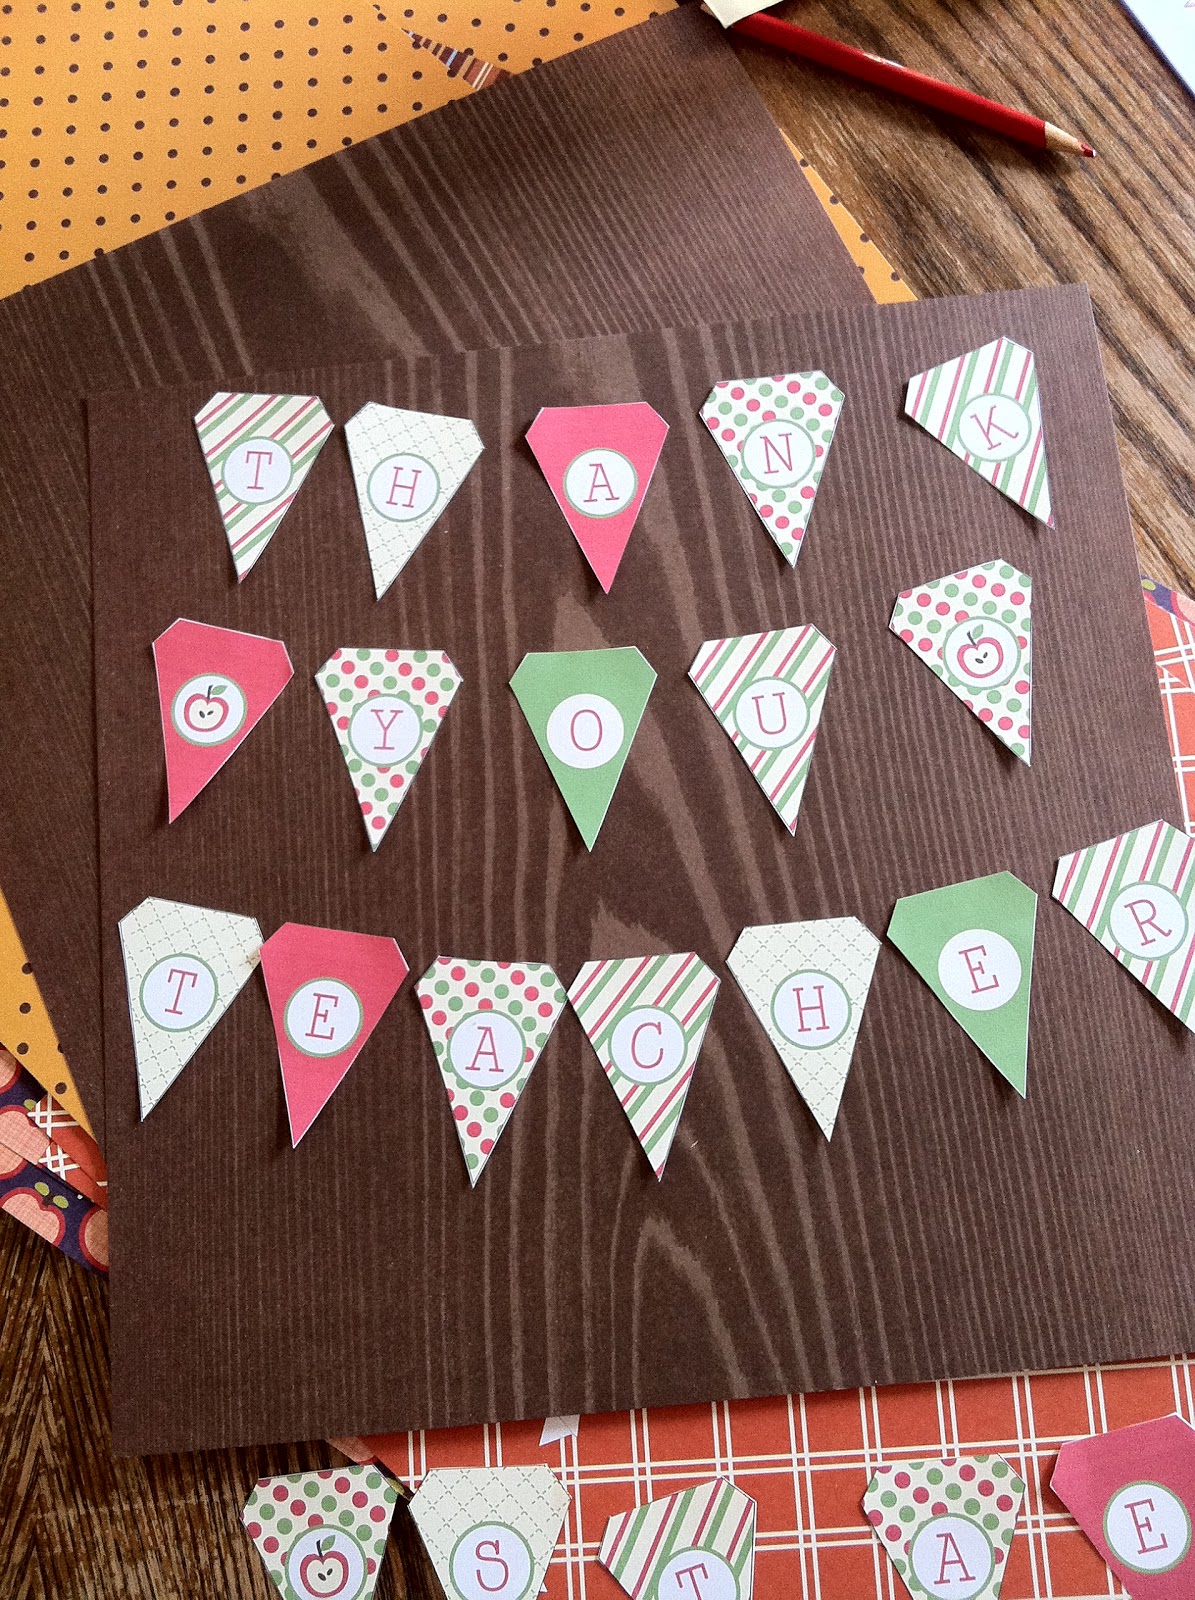
I am in charge of our teacher/staff appreciation Potato Bar Lunch at my kiddos' elementary school this week. I thought I'd decorate the teacher's lounge with a cute banner of some sort. Looking for inspiration, I stumbled upon this adorable website How Does She? with free printables for special occasions such as....teacher appreciation! I printed and trimmed up the banner letters and lay them out...

After a few moments of staring at the mini banner (they are sitting on a 12x12 piece of paper for size comparison) inspiration did, in fact, hit: I needed to string them together with yarn and punctuate it with crocheted apple slices!

So after a bit more searching I found a pattern for the type of apple slices I wanted and adapted it to fit my mini banner. You can locate the original pattern from lion brand yarn here. Below are my modifications:

G hook
White, Red, Black & Green WW yarns

Worked in the round

Apple Slices (using White)

Magic Circle (6)
Rnd 1: 2 sc around (12)
Rnd 2: *sc, 2 sc in next st* around (18)
Rnd 3: *sc 2, 2 sc in next st* around (24)
Rnd 4: *sc 3, 2 sc in next st* around (30)
Rnd 5: *sc 4, 2 sc in next st* around (36)
Change to Red
Rnd 6: *sc 5, 2 sc in next st* around (42)
F.O. and weave in ends

Embroider black seeds and fold in half and whip stitch together with red yarn.
The rest of the pattern is according to the lion brand website.


I really wanted to crochet into the paper banner and after a trial run I used this method:


Using a small hole punch, punch 2 holes in each banner letter (or banner apple).


Using an E sized hook, I inserted the hook into the left hole front to back and gently pulled through a loop.

yo and sl st

Ch 4

With yarn on hook, insert hook into right hole front to back.

yo and sl st

Ch 5


Take next banner letter and repeat this process, gently using the sl st to pull the yarn through each hole, chain 4 while on the banner and chain 5 when connecting banner letters.


I chained an equal amount on either side of the banner and attached the apples. The end result made me smile! I can't wait to see it all hung up in the teacher's lounge, adorably proclaiming our appreciation of Walnut Grove Elementary's awesome staff!