My eyes just came across a splendid new resource for free crochet patterns. I love that I can look up free patterns through crochetville and craftster, but nothing replaces a lovely looking and well thought out blog. This gal is a photographer as well as a lover of crochet and her website reflects her talents.
Check out Crochetlatte here!

Saturday, September 15, 2012
Monday, June 18, 2012
Super Sonic (Sega): Crochet!
We have such an amazing talent and generous artist in Wolfdreamer when it comes to yarn art. She offers free patterns for a bunch of kid (and adult) favorite characters. Check out her website here.
Last year I took on the challenge of crocheting a Sonic the Hedgehog from her awesome pattern. It was so fulfilling to create something COOL that you couldn't buy in a store. My youngest son, a huge Sonic fan, was beside himself with joy when he opened his new plushie Sonic for his birthday last year and still sleeps with him. You can see my version and my variations here. A year later, as another birthday approached, he asked me for a Super Sonic. As his love for the speedy hedgehog had not waned, I couldn't resist. He was so fun to make.
.JPG)
.JPG)
.JPG) Using a Deborah Norville WW in Baby Yellow and a Lily Sugar n' Cream, well, Cream, I worked Super Sonic just the same as the Sonic pattern. The only other variation was the red eyes. I tried to turn up the quills at the tips, but they don't really stay that way, which is okay. He makes a great playmate for Sonic anyway!
Using a Deborah Norville WW in Baby Yellow and a Lily Sugar n' Cream, well, Cream, I worked Super Sonic just the same as the Sonic pattern. The only other variation was the red eyes. I tried to turn up the quills at the tips, but they don't really stay that way, which is okay. He makes a great playmate for Sonic anyway!
Last year I took on the challenge of crocheting a Sonic the Hedgehog from her awesome pattern. It was so fulfilling to create something COOL that you couldn't buy in a store. My youngest son, a huge Sonic fan, was beside himself with joy when he opened his new plushie Sonic for his birthday last year and still sleeps with him. You can see my version and my variations here. A year later, as another birthday approached, he asked me for a Super Sonic. As his love for the speedy hedgehog had not waned, I couldn't resist. He was so fun to make.
.JPG)
.JPG)
.JPG)
Friday, May 18, 2012
Chronicles of Meap: Crochet!
From the amazing adventures of Phineas and Ferb comes the not Bungaroo named Meap. In fact he is a space alien, and probably the cutest one you've ever seen. He even vomits rainbows, which is somehow adorable. Without his translating mustache he simply says "Meap!"

Hook size G
Yarn: WW white, WW pink
Felt in blue, black & white
Yarn Needle & a tiny bit of black yarn
Thread & Needle
Fiberfill
Unless otherwise posted, this pattern is worked in the round:
HEAD (using white)
MC 6
R1: 2 sc in each st (12)
R2: *1 sc, 2 sc in next st* around (18)
R3: *2 sc, 2 sc in next st* around (24)
R4: *3 sc, 2 sc in next st* around (30)
R5: *4 sc, 2 sc in next st* around (36)
R6: *5 sc, 2 sc in next st* around (42)
R7: *6 sc, 2 sc in next st* around (48)
R8 - R19 : sc around (48)
R20: *6 sc, sc2tog* around (42)
R21: *5 sc, sc2tog* around (36)
R22: *4 sc, sc2tog* around (30)
R23: *3 sc, sc2tog* around (24)
WORK ON FACE: Cut out a large blue circle, smaller black circle and 2 small eye highlights
Sew the eyes onto the head, note: they are fairly wide set
Using black yarn & yarn needle, embroider mouth. This took me forever, trying to find just the right way to show an underbite. Work it until your happy with it.

R24:*2 sc, s2tog* around (18)
R25: sc around (18)
F.O.
STUFF with fiberfill
HAT (using pink)
MC 6
R1: 2 sc in each st (12)
R2: *1 sc, 2 sc in next st* around (18)
R3: *2 sc, 2 sc in next st* around (24)
R4: *3 sc, 2 sc in next st* around (30)
R5: *4 sc, 2 sc in next st* around (36)
R6: *5 sc, 2 sc in next st* around (42)
R7: *6 sc, 2 sc in next st* around (48)
R8 - R18 : sc around (48)


EARS - make 2 (using pink)
MC 6
R1: 2 sc in each (12)
R2: *1 sc, 2 sc in next st* around (18)
R3- R6 : sc around (18)
F.O. leaving a long tail
STUFF & SEW onto hood. Do not close the ear, but as you sew onto the hood in a circle so it stays puffed out.
BODY (using white)
MC 6
R1: 2 sc in each st (12)
R2: *1 sc, 2 sc in next st* around (18)
R3: *2 sc, 2 sc in next st* around (24)
R4: *3 sc, 2 sc in next st* around (30)
R5: *4 sc, 2 sc in next st* around (36)
R6 - R18: sc around (36)
R 19: *4 sc, sc2tog* around (30)
R 20-R22: sc around (30)
R 23: *3 sc, sc2tog* around (24)
F.O. leaving a long tail
ARMS & LEGS - make 4 (using white)
MC 5
R1: 2 sc in each st (10)
R2: *1 sc, 2 sc in next st* around (15)
R3-R16: sc around (15)
F.O. and leave long tail
STUFF & SEW legs in the circle shape (open) onto the bottom of the body section.
STUFF & SEW arms first by sealing the opening with a whip stitch. Then sew onto the top of the body section near the neck.

Assembly:
Attach hat to head.
Attach head to body.
Attach arms & legs as suggested.
Cut out black felt mustache & sew on, if desired.

"
.gif) |
| Isn't he SO CUTE??! |
And now, my version of Meap done crochet style:

Hook size G
Yarn: WW white, WW pink
Felt in blue, black & white
Yarn Needle & a tiny bit of black yarn
Thread & Needle
Fiberfill
Unless otherwise posted, this pattern is worked in the round:
HEAD (using white)
MC 6
R1: 2 sc in each st (12)
R2: *1 sc, 2 sc in next st* around (18)
R3: *2 sc, 2 sc in next st* around (24)
R4: *3 sc, 2 sc in next st* around (30)
R5: *4 sc, 2 sc in next st* around (36)
R6: *5 sc, 2 sc in next st* around (42)
R7: *6 sc, 2 sc in next st* around (48)
R8 - R19 : sc around (48)
R20: *6 sc, sc2tog* around (42)
R21: *5 sc, sc2tog* around (36)
R22: *4 sc, sc2tog* around (30)
R23: *3 sc, sc2tog* around (24)
WORK ON FACE: Cut out a large blue circle, smaller black circle and 2 small eye highlights
Sew the eyes onto the head, note: they are fairly wide set
Using black yarn & yarn needle, embroider mouth. This took me forever, trying to find just the right way to show an underbite. Work it until your happy with it.

R24:*2 sc, s2tog* around (18)
R25: sc around (18)
F.O.
STUFF with fiberfill
HAT (using pink)
MC 6
R1: 2 sc in each st (12)
R2: *1 sc, 2 sc in next st* around (18)
R3: *2 sc, 2 sc in next st* around (24)
R4: *3 sc, 2 sc in next st* around (30)
R5: *4 sc, 2 sc in next st* around (36)
R6: *5 sc, 2 sc in next st* around (42)
R7: *6 sc, 2 sc in next st* around (48)
R8 - R18 : sc around (48)


EARS - make 2 (using pink)
MC 6
R1: 2 sc in each (12)
R2: *1 sc, 2 sc in next st* around (18)
R3- R6 : sc around (18)
F.O. leaving a long tail
STUFF & SEW onto hood. Do not close the ear, but as you sew onto the hood in a circle so it stays puffed out.
BODY (using white)
MC 6
R1: 2 sc in each st (12)
R2: *1 sc, 2 sc in next st* around (18)
R3: *2 sc, 2 sc in next st* around (24)
R4: *3 sc, 2 sc in next st* around (30)
R5: *4 sc, 2 sc in next st* around (36)
R6 - R18: sc around (36)
R 19: *4 sc, sc2tog* around (30)
R 20-R22: sc around (30)
R 23: *3 sc, sc2tog* around (24)
F.O. leaving a long tail
ARMS & LEGS - make 4 (using white)
MC 5
R1: 2 sc in each st (10)
R2: *1 sc, 2 sc in next st* around (15)
R3-R16: sc around (15)
F.O. and leave long tail
STUFF & SEW legs in the circle shape (open) onto the bottom of the body section.
STUFF & SEW arms first by sealing the opening with a whip stitch. Then sew onto the top of the body section near the neck.

Assembly:
Attach hat to head.
Attach head to body.
Attach arms & legs as suggested.
Cut out black felt mustache & sew on, if desired.

He's a cute fella and turned out almost "life" size! A good snuggly :)
Meap!
Monday, March 19, 2012
Piñata Angry Birds Pig King
It is true: My Etsy store has been neglected. There are hardly any items left in my store. This is indicative of both good and bad news. Good news is that my mini hats and little characters have nearly all sold! The bad news is that I haven't had time to crochet much this year! I figured I'd give a little insight into why this has happened.
I love to throw parties. Birthday parties. Mother's Day teas. Oscar Parties. 4th of July neighborhood BBQs. If it needs food, decorations, and a game or two, I'm in!
Birthdays, especially, are fun to put on. I love to make my beautiful family feel special on their day of days and I guess using my interests and talents to throw a party is one way I show my love! For my kids, they know that when birthday time comes around, they get to pick a "theme" and mom will sort of just run with it. Now, I have a lot of help. I have the internet with all the world's great ideas at the touch of a button. And I have my Dad, who's great ideas have planned parties for my brother and me as we grew up and have continued now to his grandchildren. With such great resources, I was able to pull off an Angry Birds party for my wonderful eight year old girl! Specifically I've spent many an hour becoming as much an expert at piñata making as I could this past month.
If you are interested in piñata making, check out these pictures and tips but don't forget to stop by http://pinataboy.com where I got most of my tips to make this great Angry Birds Pig King piñata!
So it may have only lasted 5 minutes, but this pig was a blast to make and I would totally do it again! It takes a long time, so give yourself 2 weeks to allow for all the overnight drying that needs to occur between layers of flour glue as well as paint. Also useful is a fan to help with the drying. But for all the time it takes, it's super cheap to make and the possibilities are endless. Again, check out the Piñata Boy to see some other great ideas for piñata making!
So there it is. Why my etsy store has been neglected :)
I love to throw parties. Birthday parties. Mother's Day teas. Oscar Parties. 4th of July neighborhood BBQs. If it needs food, decorations, and a game or two, I'm in!
Birthdays, especially, are fun to put on. I love to make my beautiful family feel special on their day of days and I guess using my interests and talents to throw a party is one way I show my love! For my kids, they know that when birthday time comes around, they get to pick a "theme" and mom will sort of just run with it. Now, I have a lot of help. I have the internet with all the world's great ideas at the touch of a button. And I have my Dad, who's great ideas have planned parties for my brother and me as we grew up and have continued now to his grandchildren. With such great resources, I was able to pull off an Angry Birds party for my wonderful eight year old girl! Specifically I've spent many an hour becoming as much an expert at piñata making as I could this past month.
If you are interested in piñata making, check out these pictures and tips but don't forget to stop by http://pinataboy.com where I got most of my tips to make this great Angry Birds Pig King piñata!
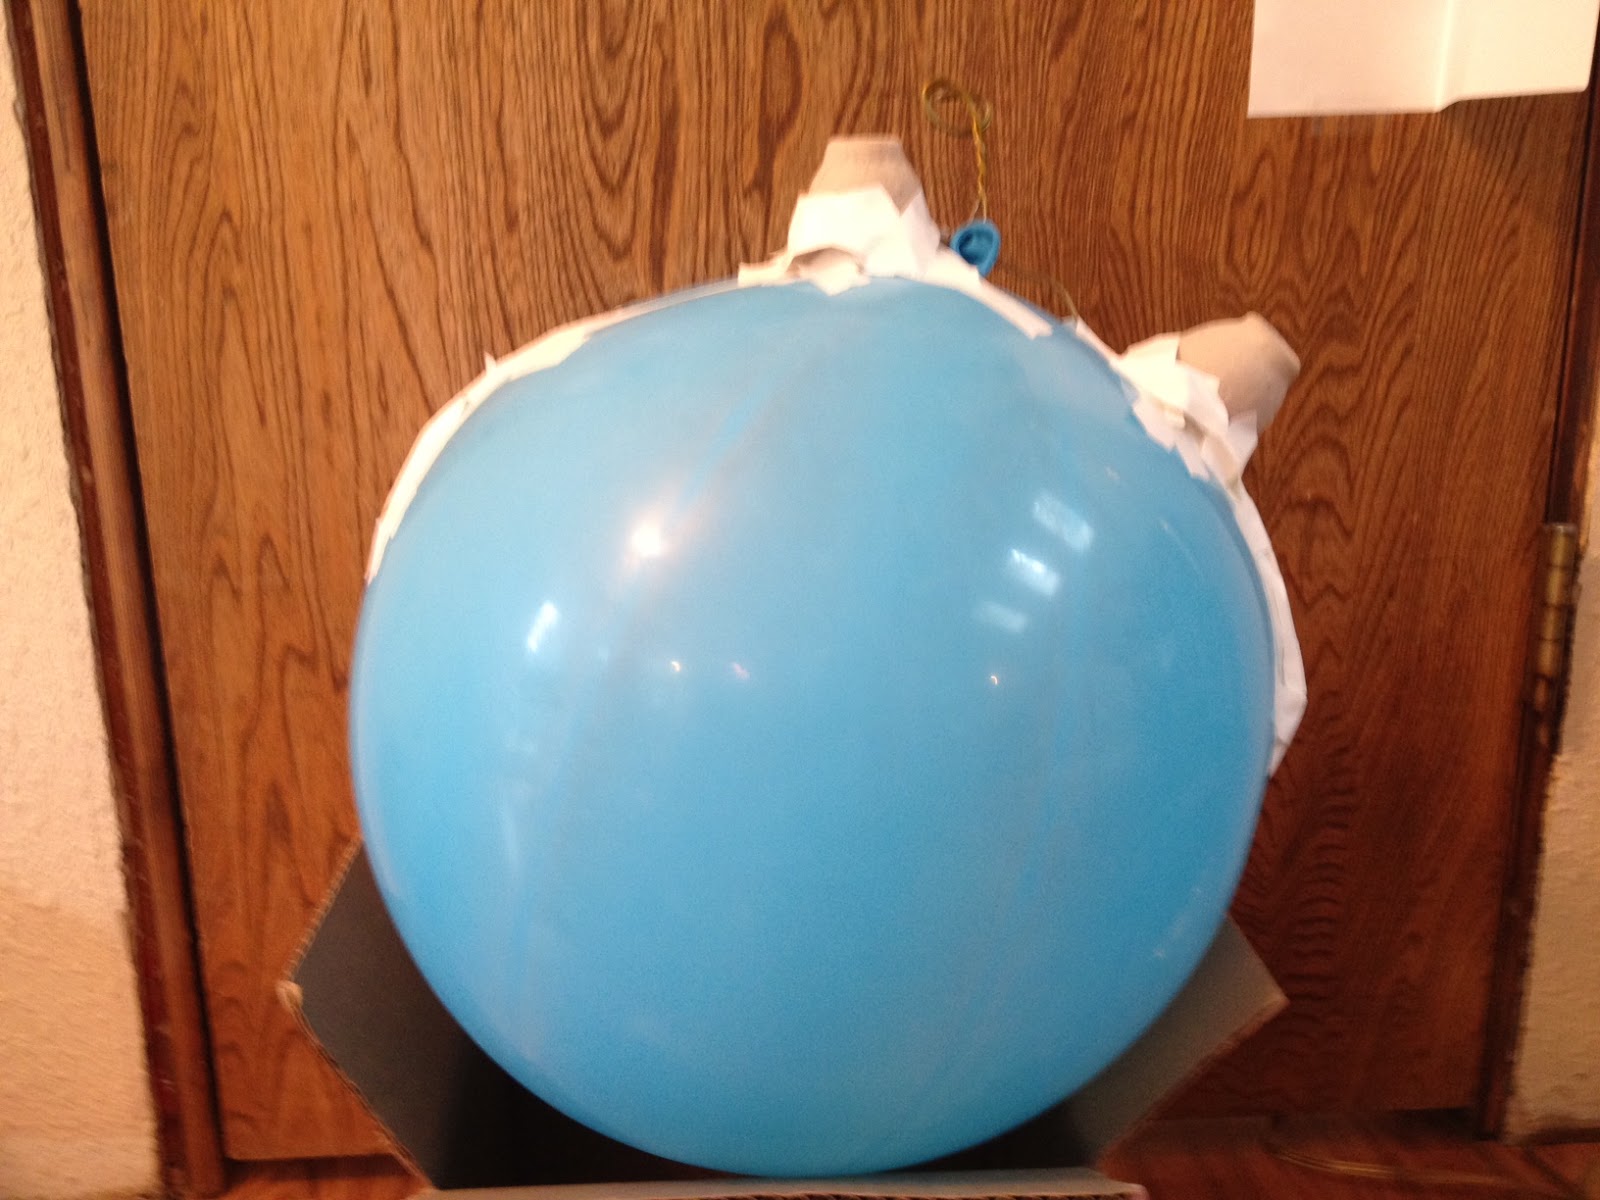 |
| SHAPE IT: Using a large "bop" balloon, I taped on egg carton cups for ears |
 |
| HANGING DEVICE: Removing the paper roll from a dry cleaner hanger, I bent the hanger into a loop and taped it down the sides of the balloon |
 |
| SUPPLIES: 1 part water, 1 part flour for glue (add salt and a bit of cinnamon to help preserve mix and make it smell nice!) LOTS of newspaper strips in a variety of sizes |
 |
| METHOD: Dredge the newspaper strips in the flour glue and apply to balloon and ears leaving a hole near the top where the candy will go in. LAYERS: I covered the balloon and it it dry completely FOUR times. The result was a sturdy piñata that lasted JUST long enough for 12 kids to take a whack at (see below) |
 |
| PAINT IT! |
 |
| Definitely an activity for the whole family! TIP: wear clothes you don't care about! |
 |
| and MORE paint! I bought 2 of these small paints We painted with the first bottle, let it dry over night, and repainted with the second bottle the next day. It covered it pretty well. |
 |
| ADD FEATURES: I used a Sharpie to draw on the nose and eye brows. Paper cut outs for the eyes and crown. |
 |
| Oink! Oink! TO FINISH: Pop balloon and pull out. Fill with candy and prizes! |
 |
| PARTY TIME!!! We attached the piñata with bungee cords to our basketball hoop. The pig was bounced for each kid to make it harder. |
 |
| The Birthday Girl goes first |
 |
| Then we lined up smallest to tallest. Littlest ones got a few swings without a blindfold |
 |
| The older kids were blindfolded and given 3 whacks! |
 |
| If they'd rather not have a blind fold, we let them have one whack |
 |
| STAND BACK EVERYONE! |
 |
| It was PERFECT! Everyone got to help whack open the piñata! |
 |
| You have been defeated, Pig King! |
 |
| Candy!!! |
 |
| A success! |
So there it is. Why my etsy store has been neglected :)
Sunday, February 12, 2012
Hobbes & Hearts: A Valentine Version
My daughter saw Hobbes and instantly needed one. Since my oldest got his Hobbes for his December birthday I thought, "Okay, I can make one for your March birthday." March was TOO far away. She saw her brother being pounced on by his Hobbes and he wouldn't share. She needed one NOW.
I admit I was anxious to try another Hobbes to solidify the adjustments I made to this Sugar n' Cream pattern. So I figured I could satisfy both of our interests in making a new one sooner than later.
"But wait, Mommy!"
"Yes?"
"I want a VALENTINE'S Hobbes!"
Of course you do, sweetie. How could I resist?
.JPG)
.JPG) He was so much fun to make. I added little felt hearts to the pads of the feet, one to the tummy, and made the nose heart-shaped. As I mentioned a few days ago, I think I'm starting to like Valentine's Day more!
He was so much fun to make. I added little felt hearts to the pads of the feet, one to the tummy, and made the nose heart-shaped. As I mentioned a few days ago, I think I'm starting to like Valentine's Day more!
Of course Valentine's Hobbes needed a scarf, too:


 Using 5 hdc rows for as long as I needed the scarf to be and cutting out a couple matching felt hearts, this little scarf became a perfect accessory for V-Day Hobbes. And we all know that Hobbes isn't above dressing up in scarves that match the season...

My daughter actually gets into the fact that she's pretty much the Suzie of the family and enjoys out smarting the brothers. For all she goes through with Calvin's taunting, she normally gets the last word. So just to send you off with one more...

I admit I was anxious to try another Hobbes to solidify the adjustments I made to this Sugar n' Cream pattern. So I figured I could satisfy both of our interests in making a new one sooner than later.
"But wait, Mommy!"
"Yes?"
"I want a VALENTINE'S Hobbes!"
Of course you do, sweetie. How could I resist?
.JPG)
.JPG)
Of course Valentine's Hobbes needed a scarf, too:


My daughter actually gets into the fact that she's pretty much the Suzie of the family and enjoys out smarting the brothers. For all she goes through with Calvin's taunting, she normally gets the last word. So just to send you off with one more...

Happy Valentine's Day!
Friday, February 10, 2012
Hobbes: Crochet!
I am thrilled when I see my kids reading comic books. Perhaps some would gawk at this, but I embrace it. Of course, the comic of choice in our household is Calvin & Hobbes. If any comic could build a big vocabulary, that one would! I love that they laugh along side the famous duo even if they don't fully understand it. "What does 'nuances' mean?" "What's 'mayhem'?" "Why is Calvin's mom mad?" They then bring the comic to life as they reenact certain recurring events including G.R.O.S.S. meetings and Calvinball. But without a Hobbes, they have not been able to reenact the reunion of Calvin & Hobbes after a long day apart.

My oldest adores Hobbes. For Halloween we sprayed his hair yellow, found a red shirt with black stripes and he was Calvin. But he needed a Hobbes to complete the ensemble. However, Bill Watterson never allowed his characters to be licensed for plushies (or anything else for that matter) so finding a Hobbes look a like was a challenge. We were able to find a cute Hobbes substitute for the costume at a Goodwill that year, but ever since, my eyes have been scanning the web for crochet patterns. In my searching I came across several great Hobbes projects folks had crafted:
http://www.flickr.com/photos/amigurumiphotos/4450655872/
http://www.cuteamigurumi.com/2009/06/29/hobbes-andno-calvin/
Of course Hobbes doesn't look like an active tiger all the time. To moms and dads he's just a stuffed animal:
http://www.craftster.org/forum/index.php?topic=334522.0
http://www.amiamour.com/2010/08/hobbes-your-imaginary-friend/
http://sukigirl74.blogspot.com/2011/03/free-hobbes-crochet-pattern.html
I noticed that so much of what makes Hobbes great is in the details of his face, which each fiber artist interpets themselves. This gave me the idea to look at some generic toy tiger patterns that I could then adapt. I decided to start small and my first Hobbes was inspired by this Sugar n' Cream pattern:
http://www.sugarncream.com/pattern.php?PID=4772&cps=21191
I liked the full amigurumi style of this little guy, and the color scheme (doing brown & orange instead of black and orange) but he needed some major adjustments on body shape, tail length and facial features to really become Hobbes. The end result?
.JPG)
.JPG)
.JPG)
Calvin & Hobbes love the snow so much, you often see Hobbes wearing a scarf:

A quick work up of 5 hdc across to the proper scarf length gave Hobbes an accessory for the winter weather:


If enough folks are interested in the specific changes I made to the toy tiger pattern from Sugar n' Cream, I'll try to post it soon. For now enjoy a last C&H comic strip and come back this weekend for

Saturday, January 28, 2012
Valentine's Day Bunting: Crochet!
Valentine's day was never my favorite holiday. Sure, as a kid, it's great to pass out valentine cards and any holiday that produced free candy was always welcome, but as an adult I never got into the "let's buy expensive gifts for one another" idea and over time my cynical views of consumerism and sappy Halmark commercials embedded itself so deeply that up till now as I tried to be a fun, creative mom to three kids, I shied away from the so called "holiday."
This year, however, my old calloused heart is softening to the spirit of Valentine's day. With the help of Pinterest I have found not only cute, reasonable priced (aka free) things to do around this heart-filled holiday, but also realized just how special it is when someone intentionally writes down, in their own hand, how special you are to them. I saw this great idea to have each member of your family hand write a "Valentine" to each other member of the family. Not just to sign your name on a preprinted "BE MINE" Valentine card, but actually take the time to think of the person, what they like about them, and then write it down in your own script. My kids need this. In a time when they are coming up against many hard decisions and difficult people, they need to know that their family, their brother and sister, their mom and dad think they are a wonderful and important part of their family.
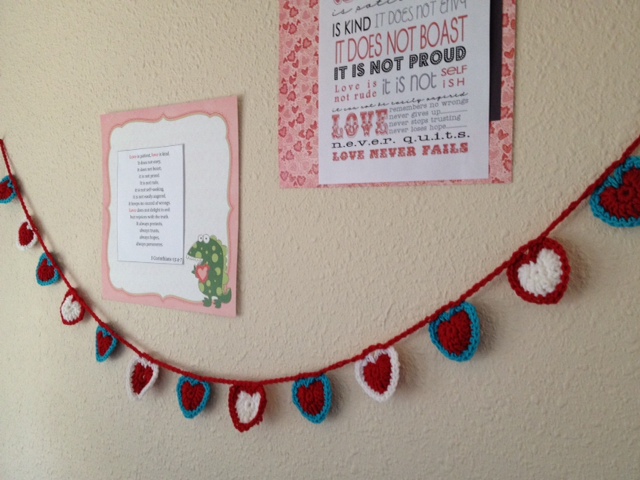
With this on my heart, I thought some small decorations in the realm of hearts would be appropriate to set the mood. But I couldn't just do any ol' heart thing. It had to be unique. I tried to do pink and red and white...but this just made me sit back and sigh. It just wasn't the look I wanted. If I was going to put forth effort in this endeavor, I was going to LIKE the color scheme. Here's what I came up with (thanks to Pinterest helping me discover this fun pattern from Julia Crossland):
This year, however, my old calloused heart is softening to the spirit of Valentine's day. With the help of Pinterest I have found not only cute, reasonable priced (aka free) things to do around this heart-filled holiday, but also realized just how special it is when someone intentionally writes down, in their own hand, how special you are to them. I saw this great idea to have each member of your family hand write a "Valentine" to each other member of the family. Not just to sign your name on a preprinted "BE MINE" Valentine card, but actually take the time to think of the person, what they like about them, and then write it down in your own script. My kids need this. In a time when they are coming up against many hard decisions and difficult people, they need to know that their family, their brother and sister, their mom and dad think they are a wonderful and important part of their family.
With this on my heart, I thought some small decorations in the realm of hearts would be appropriate to set the mood. But I couldn't just do any ol' heart thing. It had to be unique. I tried to do pink and red and white...but this just made me sit back and sigh. It just wasn't the look I wanted. If I was going to put forth effort in this endeavor, I was going to LIKE the color scheme. Here's what I came up with (thanks to Pinterest helping me discover this fun pattern from Julia Crossland):
.JPG) |
| mmmmmm....red & teal! |
.JPG) |
| Lots of HEARTS! |
 |
| Bunting Love |
 |
| YAY! I'm beginning to like Valentine's Day! |
I had such fun crocheting these as I watched our recorded Australian Open match between Rafa Nadal and Roger Federer (although it was hard to see Rog continue to hit it into the net!! ARG!). As I said, I tried to do pink and red and white, but I just needed my red and teal combo so I broke from the Valentine norm and made it my own. If you see the cute "LOVE IS" print from I Corinthians, you should head on over here to grab the free printable.
I hope your hearts are softened to Valentine's Day as mine has been! And if you need a little softening, grab some soft yarn in your favorite colors and make a heart garland of your very own this year - it'll be sure to help!
Subscribe to:
Posts (Atom)