Showing posts with label special occassions. Show all posts

Monday, March 19, 2012

Piñata Angry Birds Pig King

It is true: My Etsy store has been neglected. There are hardly any items left in my store. This is indicative of both  good and bad news. Good news is that my mini hats and little characters have nearly all sold! The bad news is that I haven't had time to crochet much this year! I figured I'd give a little insight into why this has happened.

I love to throw parties. Birthday parties. Mother's Day teas. Oscar Parties. 4th of July neighborhood BBQs. If it needs food, decorations, and a game or two, I'm in!

Birthdays, especially, are fun to put on. I love to make my beautiful family feel special on their day of days and I guess using my interests and talents to throw a party is one way I show my love! For my kids, they know that when birthday time comes around, they get to pick a "theme" and mom will sort of just run with it. Now, I have a lot of help. I have the internet with all the world's great ideas at the touch of a button. And I have my Dad, who's great ideas have planned parties for my brother and me as we grew up and have continued now to his grandchildren. With such great resources, I was able to pull off an Angry Birds party for my wonderful eight year old girl! Specifically I've spent many an hour becoming as much an expert at piñata making as I could this past month.

If you are interested in piñata making, check out these pictures and tips but don't forget to stop by http://pinataboy.com where I got most of my tips to make this great Angry Birds Pig King piñata!

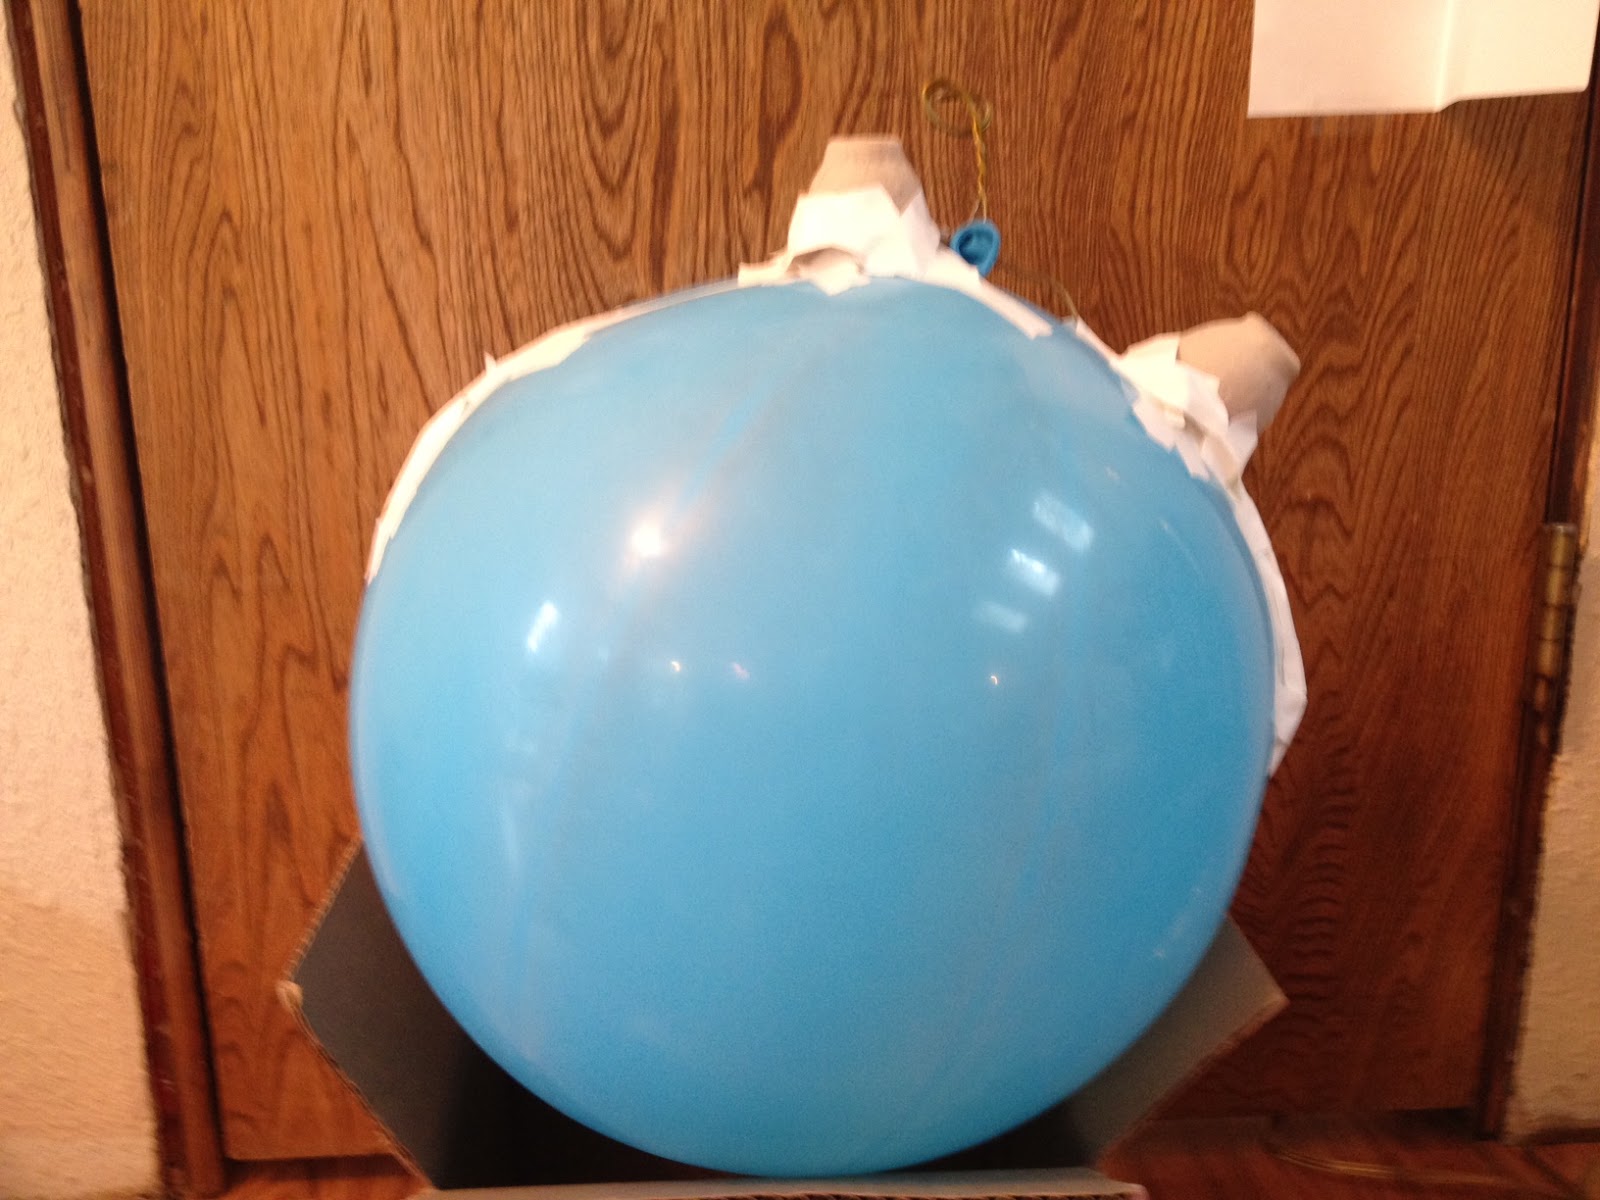
SHAPE IT:
Using a large "bop" balloon, I taped on egg carton cups for ears

HANGING DEVICE:
Removing the paper roll from a dry cleaner hanger,
I bent the hanger into a loop and taped it down the sides of the balloon

SUPPLIES:
1 part water, 1 part flour for glue
(add salt and a bit of cinnamon to help preserve mix and make it smell nice!)
LOTS of newspaper strips in a variety of sizes

METHOD:
Dredge the newspaper strips in the flour glue and apply to balloon
and ears leaving a hole near the top where the candy will go in.
LAYERS:
I covered the balloon and it it dry completely FOUR times.
The result was a sturdy piñata that lasted JUST long enough for
12 kids to take a whack at (see below)


PAINT IT!

Definitely an activity for the whole family!
TIP: wear clothes you don't care about!

and MORE paint!
I bought 2 of these small paints
We painted with the first bottle, let it dry over night,
and repainted with the second bottle the next day.
It covered it pretty well.

ADD FEATURES:
I used a Sharpie to draw on the nose and eye brows.
Paper cut outs for the eyes and crown.

Oink! Oink!
TO FINISH:
Pop balloon and pull out. Fill with candy and prizes!
PARTY TIME!!!
We attached the piñata with bungee cords to our basketball hoop.
The pig was bounced for each kid to make it harder.

The Birthday Girl goes first

Then we lined up smallest to tallest.
Littlest ones got a few swings without a blindfold

The older kids were blindfolded and given 3 whacks!

If they'd rather not have a blind fold, we let them have one whack

STAND BACK EVERYONE!

It was PERFECT! Everyone got to help whack open the piñata!

You have been defeated, Pig King!

Candy!!!

A success!


So it may have only lasted 5 minutes, but this pig was a blast to make and I would totally do it again! It takes a long time, so give yourself 2 weeks to allow for all the overnight drying that needs to occur between layers of flour glue as well as paint. Also useful is a fan to help with the drying. But for all the time it takes, it's super cheap to make and the possibilities are endless. Again, check out the Piñata Boy to see some other great ideas for piñata making!

So there it is. Why my etsy store has been neglected :)

Sunday, February 12, 2012

Hobbes & Hearts: A Valentine Version

My daughter saw Hobbes and instantly needed one. Since my oldest got his Hobbes for his December birthday I thought, "Okay, I can make one for your March birthday." March was TOO far away. She saw her brother being pounced on by his Hobbes and he wouldn't share. She needed one NOW.

I admit I was anxious to try another Hobbes to solidify the adjustments I made to this Sugar n' Cream pattern. So I figured I could satisfy both of our interests in making a new one sooner than later.

"But wait, Mommy!"
"Yes?"
"I want a VALENTINE'S Hobbes!"

Of course you do, sweetie. How could I resist?


He was so much fun to make. I added little felt hearts to the pads of the feet, one to the tummy, and made the nose heart-shaped. As I mentioned a few days ago, I think I'm starting to like Valentine's Day more!

Of course Valentine's Hobbes needed a scarf, too:


Using 5 hdc rows for as long as I needed the scarf to be and cutting out a couple matching felt hearts, this little scarf became a perfect accessory for V-Day Hobbes. And we all know that Hobbes isn't above dressing up in scarves that match the season...


My daughter actually gets into the fact that she's pretty much the Suzie of the family and enjoys out smarting the brothers. For all she goes through with Calvin's taunting, she normally gets the last word. So just to send you off with one more...

Happy Valentine's Day!


Saturday, January 28, 2012

Valentine's Day Bunting: Crochet!

Valentine's day was never my favorite holiday. Sure, as a kid, it's great to pass out valentine cards and any holiday that produced free candy was always welcome, but as an adult I never got into the "let's buy expensive gifts for one another" idea and over time my cynical views of consumerism and sappy Halmark commercials embedded itself so deeply that up till now as I tried to be a fun, creative mom to three kids, I shied away from the so called "holiday."

This year, however, my old calloused heart is softening to the spirit of Valentine's day. With the help of Pinterest I have found not only cute, reasonable priced (aka free) things to do around this heart-filled holiday, but also realized just how special it is when someone intentionally writes down, in their own hand, how special you are to them. I saw this great idea to have each member of your family hand write a "Valentine" to each other member of the family. Not just to sign your name on a preprinted "BE MINE" Valentine card, but actually take the time to think of the person, what they like about them, and then write it down in your own script. My kids need this. In a time when they are coming up against many hard decisions and difficult people, they need to know that their family, their brother and sister, their mom and dad think they are a wonderful and important part of their family.

With this on my heart, I thought some small decorations in the realm of hearts would be appropriate to set the mood.  But I couldn't just do any ol' heart thing. It had to be unique. I tried to do pink and red and white...but this just made me sit back and sigh. It just wasn't the look I wanted. If I was going to put forth effort in this endeavor, I was going to LIKE the color scheme. Here's what I came up with (thanks to Pinterest helping me discover this fun pattern from Julia Crossland):

mmmmmm....red & teal!

Lots of HEARTS!

Bunting Love

YAY! I'm beginning to like Valentine's Day!

I had such fun crocheting these as I watched our recorded Australian Open match between Rafa Nadal and Roger Federer (although it was hard to see Rog continue to hit it into the net!! ARG!). As I said, I tried to do pink and red and white, but I just needed my red and teal combo so I broke from the Valentine norm and made it my own. If you see the cute "LOVE IS" print from I Corinthians, you should head on over here to grab the free printable. 

I hope your hearts are softened to Valentine's Day as mine has been! And if you need a little softening, grab some soft yarn in your favorite colors and make a heart garland of your very own this year - it'll be sure to help!

Wednesday, January 4, 2012

Etsy Sale!

In honour of the birthday of the late great Dr. Suess (and the inspiration for my Cat in the Hat mini hat clip) I am having a store wide sale at my Etsy store through March, 2, 2012!

^-^ **~** Enjoy a 20% discount on any mini hat clip! **~** ^-^

I'm sure I'm not alone when I mention that my kids' elementary school has a big Dr. Seuss "to do" in the month of March with tall striped hats and a green eggs and ham breakfast. Big and little girls alike would look absolutely adorable wearing a pint sized version of the Cat's famous Hat! I will be happy to take orders through mid February on orders that need to arrive by Dr. Suess' birthday (March 2nd).


My youngest is a big fan of the amazing Dr. Suess and has opened my eyes to more of his books than I even knew existed! While I grew up memorizing rhymes from Yertle the Turtle, Cat in the Hat and the tongue bewitching Fox in Socks, my sweet boy has grown up reciting lines from Hop on Pop, Horton Hatches the Egg and What Was I Scared Of? 


And so to sign this post off, some wisdom from the man himself:
"Today you are you, that is truer than true
There is no one alive who is youer than YOU!"


Discount code: drsuess2012
works only at
http://www.etsy.com/shop/karilandia

Tuesday, October 25, 2011

Candy Corn Scarf: Crochet!

I love candy corns. While it is true that there have been years where I go a little candy corn crazy and get utterly sick of them, each fall I still look forward to the sweet treats (it normally takes a good long year for that particular craving to return - thus I shun all Valentine's or Easter candy corns ^_^) To borrow a Bugs Bunny quote: "Why do I like [candy corn] so much? They don't have much meat on them...but I love them! I LOVE 'EM I LOVE 'EM I LOVE 'EM! LUNCH TIME!!!!"

But more than their goodie value, I think they are just so darn CUTE!! I love the color combination. I love the rounded triangular shape. I love that they are tiny. If you hop onto my pinterest page here you will see that I have a board devoted entirely to the Candy Corn!

So of course I needed a crochet version! Inspired by Twinkie Chan's food scarves, I crafted this one up to share with you all:


The Candy Corn Scarf:

Hook G
WW white yarn
WW orange yarn
WW yellow yarn

These are worked in rows - be sure to ch 1 at the end of each row

Begin with WHITE: (leave a long tail)
Ch 3
R1) 3 sc (3)
R2) 2 sc in first st, sc, 2 sc in last st (5)
R3) sc, sc, 2 sc in next st, sc, sc (6)
R4) sc, 2 sc in next st, sc, sc, 2 sc in next st, sc (8)

Change over to ORANGE:
R5) 8 sc (8)
R6) 8 sc (8)
R7) 2 sc in first st, 6 sc, 2 sc in last st (10)
R8) 10 sc (10)
R9) 10 sc (10)
R10) 2 sc in first st, 8 sc, 2 sc in last st (12)

Change to YELLOW:
R11) 12 sc (12)
R12) 2 sc in first st, 10 sc, 2 sc in next st (14)
R13) 14 sc (14)
R14) 14 sc (14)
R15) sc2tog, 4 sc, sc2tog, 4 sc, sc2tog (11)

F.O. and weave in ends


I made 11 candy corns and fastened them together tip to bottom until you have a scarf.
Length can be adjusted by adding or subtracting corns.


The best thing about this scarf is it won't give you a stomach ache ^_^


Sunday, October 2, 2011

Show & Tell Bunting

Warning: Another non-crochet post ^_^

Early this summer our family set goals and made room most days to work towards accomplishing them. For the kids it was goals of reading enough to earn prizes through the library's summer reading program, and learning a new skill (magic tricks, how to ride a 2 wheel bike, bake a special cookie, etc) and we had our oldest set a goal to write, produce & shoot an original movie idea.  For the adults we worked on new piano songs, caught up on scrapbooking, and set photography goals. These goals, once met, deserved to be celebrated! For the past 2 years we've put together an official Show & Tell night for the grandparents. Having a caring audience who doesn't mind oooooh-ing and aaaah-ing over both small and big achievements is so great for the kids' confidence. It's also a wonderful chance to look back and realize just how much we DID accomplish.

This year's Show & Tell had to be a bit later in the year than normal for scheduling reasons. So, this last weekend we pulled out all our projects, dusted them off a bit and got to show them off! Feeling a bit artsy this year, I decided to make a bunting style banner for the occasion and just thought I'd share it with you all:


Using various scraps of paper I had accumulated in my years of scrapbooking, I was able to create this using my new favorite color combination: reds & aquas. I also had a fun teal & brown yarn that I used to string it up with. 

It definitely made it feel like a party! Well, that and Simon's awesome homemade pretzels - yummy!


Monday, May 16, 2011

Apples & Teacher Appreciation Banner

I am in charge of our teacher/staff appreciation Potato Bar Lunch at my kiddos' elementary school this week. I thought I'd decorate the teacher's lounge with a cute banner of some sort. Looking for inspiration, I stumbled upon this adorable website How Does She? with free printables for special occasions such as....teacher appreciation! I printed and trimmed up the banner letters and lay them out...

After a few moments of staring at the mini banner (they are sitting on a 12x12 piece of paper for size comparison) inspiration did, in fact, hit: I needed to string them together with yarn and punctuate it with crocheted apple slices!

So after a bit more searching I found a pattern for the type of apple slices I wanted and adapted it to fit my mini banner. You can locate the original pattern from lion brand yarn here. Below are my modifications:

G hook
White, Red, Black & Green WW yarns

Worked in the round

Apple Slices (using White)

Magic Circle (6)
Rnd 1: 2 sc around (12)
Rnd 2: *sc, 2 sc in next st* around (18)
Rnd 3: *sc 2, 2 sc in next st* around (24)
Rnd 4: *sc 3, 2 sc in next st* around (30)
Rnd 5: *sc 4, 2 sc in next st* around (36)
Change to Red
Rnd 6: *sc 5, 2 sc in next st* around (42)
F.O. and weave in ends

Embroider black seeds and fold in half and whip stitch together with red yarn.
The rest of the pattern is according to the lion brand website.


I really wanted to crochet into the paper banner and after a trial run I used this method:


Using a small hole punch, punch 2 holes in each banner letter (or banner apple).


Using an E sized hook, I inserted the hook into the left hole front to back and gently pulled through a loop.

yo and sl st

Ch 4

With yarn on hook, insert hook into right hole front to back.

yo and sl st

Ch 5


Take next banner letter and repeat this process, gently using the sl st to pull the yarn through each hole, chain 4 while on the banner and chain 5 when connecting banner letters.


I chained an equal amount on either side of the banner and attached the apples. The end result made me smile! I can't wait to see it all hung up in the teacher's lounge, adorably proclaiming our appreciation of Walnut Grove Elementary's awesome staff!