My eyes just came across a splendid new resource for free crochet patterns. I love that I can look up free patterns through crochetville and craftster, but nothing replaces a lovely looking and well thought out blog. This gal is a photographer as well as a lover of crochet and her website reflects her talents.
Check out Crochetlatte here!

Showing posts with label Free Patterns. Show all posts
Showing posts with label Free Patterns. Show all posts
Saturday, September 15, 2012
Tuesday, December 27, 2011
W.I.P. (after Christmas version 1.0)
Christmas has come and gone. What a blur it was at times! I found myself fairly busy finishing up presents as well as keeping up with the Marcel requests through Etsy. You could hardly find me without a crochet hook in my hand! It was quite a learning experience and I do need time to process and reflect on how I dealt with the holiday rush. But when Christmas finally arrived, I was able to put away my crazy crochet filled head and enjoy celebrating Jesus' birthday with my friends and family. It was a wonderful 3 days of Christmas eve (also the day my first born celebrated his first double digit birthday), Christmas day, and Christmas day-off Monday ^-^ There was glorious food, way too many presents, and a viewing of The Christmas Story. Classic.
In the holiday rush, (and I kick myself as I realize this), I forgot to capture on digital camera my crocheted creations. I made 10 scarves (two of them from this cute v-stitch pattern), 2 cowls (based on this convertible cowl pattern I found), and an ipad cover in a glorious red with the red angry bird's face sewn on in felt pieces (based on this ipad cover pattern). I also made one Hobbes the tiger. He lives in our home, so his photos and story will go into its own post at a later date. In the midst of all this gifting I whipped up 6 Marcel the Shells as well!
But even with all I DID accomplish, I am still mid project for at least 4 things! So without further ado, here's my W.I.P Wednesday pictures! The project are all now patiently waiting for me in my large new tote I got for Christmas ^_^
 |
| A first attempt at a double yarn project! Hoping the Oregon Duck's fan in our family will like it come his birthday ^_^ |
 |
| Isn't it just obnoxious when you run out of yarn? And then don't you just *HATE* it when the store ran out of the color??! This is a soft red yarn from Deborah Norville's Serenity line and is working up great for this cowl, but I just one more skein! |
 |
| I am nearly done with this open lace style scarf. I based it on Mary Poppins' scarf, but in a peacock blue instead of coral. It should be finished with fringe if it ever gets done! |
 |
| The awesome large tote that now holds my W.I.P.'s! Thanks, Babe! |
And last I want to leave you with one of my favorite gifts of the 2011 year: A bird feeder! Yes, this bird feeder is going to be put out this spring, but with a unique purpose: as bird nest fodder for all the young birdie families in our yard. I saw this adorable idea on pinterest from fiberfarm.com and got this cutest bird feeder to stuff my yarn scraps in. I just think it will be so much fun to have the birdies build their nests with soft, colorful threads! It's like yarn bombing in disguise!
 |
| My bird feeder full of yarn scraps to be put out on the first day of spring! |
Happy New Year to all!
~kari
Monday, November 7, 2011
A Cute V-Stitch Scarf
Last Christmas I received a lovely red crocheted scarf that went with practically everything. Thus, I wore it all the time and fell in love with it! The stitch was not a lace stitch, nor was it tightly crocheted, so I set out to figure out just what technique the yarn artist used. After a bit of research I found that it was a V-stitch. It's the perfect stitch for a scarf with some heft for warmth, but loose enough to be soft and wrapped snuggly around one's neck.
I knew I wanted to do scarves this year for Christmas so I came up with my own version using the V-stitch. It works up quickly, and I really think it turned out cute. So without further ado:
 A Cute V-Stitch Scarf:
Hook G
WW yarn (I used Deborah Norville Everyday soft worsted in Chocolate Brown)
**Technique used for the V-stitch: (dc, ch 2, dc) all in one stitch**
Ch 24
R1) start 3rd stitch from hook 22 hdc, ch 2 & turn (22)
R2) 22 hdc, ch 2 & turn (22)
R3) 22 hdc, ch 3 & turn (22)
R4) sk 1 hdc, V-stitch, *sk 2 hdc, V-stitch* repeat 5 more times, sk 1 hdc, dc, ch 3 & turn (7 ch-2 spaces)
R5) V-stitch in ea ch-2 space across, then sk las dc, dc into top of turning ch, ch 3 & turn (7 ch-2 spaces)
R6) repeat R5
R7) repeat R5
R8) *hdc, hdc, hdc into ch-2 space* repeat 6 more times, hdc into top of turning ch, ch 2 & turn (22)
R9) 22 hdc, ch 2 & turn (22)
R10) 22 hdc, ch 3 & turn (22)
Repeat R4 - R10 until desired length of scarf is achieved.
I repeated the pattern a total of 12 times and end added the fringe to the bottom of both ends.
How to add the fringe:
On both ends of scarf, attach yarn and do the following:
FRINGE BASE ROW: Ch 3, sk 1 hdc, sc, *ch 2, sk 1 hdc, sc* repeat across row (you should have 11 ch-2 spaces)
Cut equal lengths of yarn and follow this picture tutorial for adding the tassels or fringe through the ch-2 spaces you created.
I knew I wanted to do scarves this year for Christmas so I came up with my own version using the V-stitch. It works up quickly, and I really think it turned out cute. So without further ado:

Hook G
WW yarn (I used Deborah Norville Everyday soft worsted in Chocolate Brown)
**Technique used for the V-stitch: (dc, ch 2, dc) all in one stitch**
Ch 24
R1) start 3rd stitch from hook 22 hdc, ch 2 & turn (22)
R2) 22 hdc, ch 2 & turn (22)
R3) 22 hdc, ch 3 & turn (22)
R4) sk 1 hdc, V-stitch, *sk 2 hdc, V-stitch* repeat 5 more times, sk 1 hdc, dc, ch 3 & turn (7 ch-2 spaces)
R5) V-stitch in ea ch-2 space across, then sk las dc, dc into top of turning ch, ch 3 & turn (7 ch-2 spaces)
R6) repeat R5
R7) repeat R5
R8) *hdc, hdc, hdc into ch-2 space* repeat 6 more times, hdc into top of turning ch, ch 2 & turn (22)
R9) 22 hdc, ch 2 & turn (22)
R10) 22 hdc, ch 3 & turn (22)
Repeat R4 - R10 until desired length of scarf is achieved.
I repeated the pattern a total of 12 times and end added the fringe to the bottom of both ends.
 |
| I used 3 lengths of yarn per ch-space for this scarf |
How to add the fringe:
On both ends of scarf, attach yarn and do the following:
FRINGE BASE ROW: Ch 3, sk 1 hdc, sc, *ch 2, sk 1 hdc, sc* repeat across row (you should have 11 ch-2 spaces)
Cut equal lengths of yarn and follow this picture tutorial for adding the tassels or fringe through the ch-2 spaces you created.
 |
| I liked the look of the dividing up the v-stitch section with the hdc Sort gives it a "patchwork" look ^_^ |
Tuesday, October 25, 2011
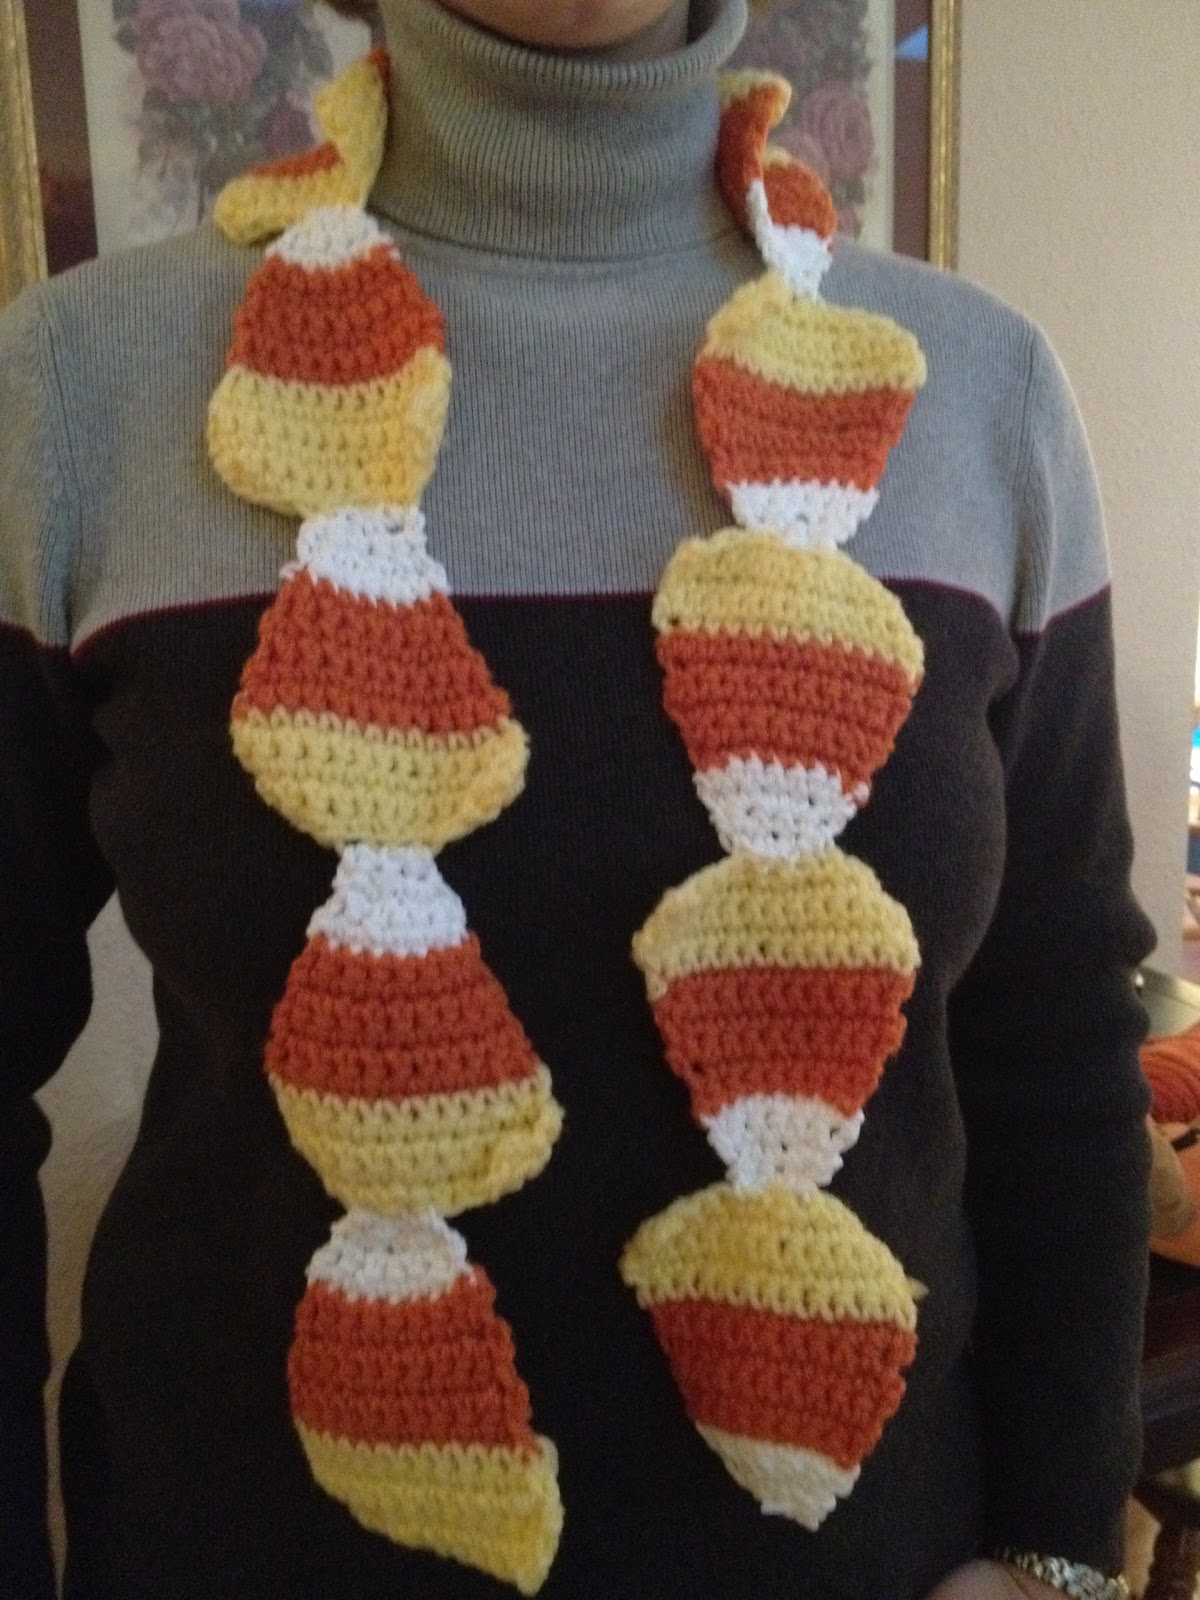
Candy Corn Scarf: Crochet!
I love candy corns. While it is true that there have been years where I go a little candy corn crazy and get utterly sick of them, each fall I still look forward to the sweet treats (it normally takes a good long year for that particular craving to return - thus I shun all Valentine's or Easter candy corns ^_^) To borrow a Bugs Bunny quote: "Why do I like [candy corn] so much? They don't have much meat on them...but I love them! I LOVE 'EM I LOVE 'EM I LOVE 'EM! LUNCH TIME!!!!"
But more than their goodie value, I think they are just so darn CUTE!! I love the color combination. I love the rounded triangular shape. I love that they are tiny. If you hop onto my pinterest page here you will see that I have a board devoted entirely to the Candy Corn!
So of course I needed a crochet version! Inspired by Twinkie Chan's food scarves, I crafted this one up to share with you all:

The Candy Corn Scarf:
Hook G
WW white yarn
WW orange yarn
WW yellow yarn
These are worked in rows - be sure to ch 1 at the end of each row
Begin with WHITE: (leave a long tail)
Ch 3
R1) 3 sc (3)
R2) 2 sc in first st, sc, 2 sc in last st (5)
R3) sc, sc, 2 sc in next st, sc, sc (6)
R4) sc, 2 sc in next st, sc, sc, 2 sc in next st, sc (8)
Change over to ORANGE:
R5) 8 sc (8)
R6) 8 sc (8)
R7) 2 sc in first st, 6 sc, 2 sc in last st (10)
R8) 10 sc (10)
R9) 10 sc (10)
R10) 2 sc in first st, 8 sc, 2 sc in last st (12)
Change to YELLOW:
R11) 12 sc (12)
R12) 2 sc in first st, 10 sc, 2 sc in next st (14)
R13) 14 sc (14)
R14) 14 sc (14)
R15) sc2tog, 4 sc, sc2tog, 4 sc, sc2tog (11)
F.O. and weave in ends

I made 11 candy corns and fastened them together tip to bottom until you have a scarf.
Length can be adjusted by adding or subtracting corns.

The best thing about this scarf is it won't give you a stomach ache ^_^
But more than their goodie value, I think they are just so darn CUTE!! I love the color combination. I love the rounded triangular shape. I love that they are tiny. If you hop onto my pinterest page here you will see that I have a board devoted entirely to the Candy Corn!
So of course I needed a crochet version! Inspired by Twinkie Chan's food scarves, I crafted this one up to share with you all:
The Candy Corn Scarf:
Hook G
WW white yarn
WW orange yarn
WW yellow yarn
These are worked in rows - be sure to ch 1 at the end of each row
Begin with WHITE: (leave a long tail)
Ch 3
R1) 3 sc (3)
R2) 2 sc in first st, sc, 2 sc in last st (5)
R3) sc, sc, 2 sc in next st, sc, sc (6)
R4) sc, 2 sc in next st, sc, sc, 2 sc in next st, sc (8)
Change over to ORANGE:
R5) 8 sc (8)
R6) 8 sc (8)
R7) 2 sc in first st, 6 sc, 2 sc in last st (10)
R8) 10 sc (10)
R9) 10 sc (10)
R10) 2 sc in first st, 8 sc, 2 sc in last st (12)
Change to YELLOW:
R11) 12 sc (12)
R12) 2 sc in first st, 10 sc, 2 sc in next st (14)
R13) 14 sc (14)
R14) 14 sc (14)
R15) sc2tog, 4 sc, sc2tog, 4 sc, sc2tog (11)
F.O. and weave in ends

I made 11 candy corns and fastened them together tip to bottom until you have a scarf.
Length can be adjusted by adding or subtracting corns.

The best thing about this scarf is it won't give you a stomach ache ^_^
Monday, September 26, 2011
Toy Hammock: Crochet!
My darling daughter loves all things snuggly. Unlike her mother who, as a child, had only a few very dear stuffed animals. Certainly not even close to the horde my little 7 year old has amassed. And it's so easy to indulge the dear when all she wants in the world is one more dragon, pony, bird, fishy, snake (yes, snakes)...
AND I like to crochet things for her...
So needless to say after seven years of collecting and being absolutely unable to give up any of those dear plushies to Goodwill, there is nary a place for her in bed for all the sleeping buddies she has.
Something needed to be done. Thankfully, I crochet. Thankfully, I found this great pattern by Candance from Crafty Concoction. Because I used a very large, unmarked, plastic hook (I THINK it's a P) I had to make some adjustments. I needed to decrease 2 "squares" each row and then added my own edging with some yellow flowers so it looked a bit like a meadow for her plushies to live in :)

So now there is at least a bit more room for the princess to lay her head at night :)
AND I like to crochet things for her...
So needless to say after seven years of collecting and being absolutely unable to give up any of those dear plushies to Goodwill, there is nary a place for her in bed for all the sleeping buddies she has.
Something needed to be done. Thankfully, I crochet. Thankfully, I found this great pattern by Candance from Crafty Concoction. Because I used a very large, unmarked, plastic hook (I THINK it's a P) I had to make some adjustments. I needed to decrease 2 "squares" each row and then added my own edging with some yellow flowers so it looked a bit like a meadow for her plushies to live in :)
 |
| The Meadow: before inhabitants |

 |
| The meadow: piled high with its denizens |
Tuesday, August 2, 2011
Marcel the Shell (with shoes on): Crochet Version!

Yep. the Eyes Have It
Marcel the Shell (with Shoes on): Crochet Version!
You will need:
E hook
G hook
WW soft brown yarn
WW white yarn
WW pink yarn
WW seaweed green yarn
1" googley eye
Brown & white felt
yarn needle/embroidery needle
SHELL:
Using soft brown yarn and Hook Size E
Begin by working in the round...
Magic Circle (6)
R1: *sc 1, 2 sc in next st* around (9)
R2: dhc around (9)
R3: 2 sc in ea st around in front loops only (18)
R4: dhc around (18)
R5: *sc 5, 2 sc in next st* around in front loops only (21)
R6: dhc around (21)
R7: *sc 5, dec 1* around in front loops only (18)
R8: *2dhc in next st* 8 times, *1dhc, 2dhc in next st* 5 times (31)
R9: dhc around (31)
R10: dhc around (31)
R11: dhc around (31)
R12: dhc around (31)
R13: sc around in front loops only (31)
R14: *5 sc, dec 1* around (24)
here you will start working in rows and shaping the googley eye hole...
R15: dhc 18, ch 10, sl st to first dhc of this row (you should sk 6 st when you do this)
R16: 1 sc into next st and sc across chain row, 1 sc into next st, turn, ch 1
R17: sc across chain row, 1 sc into next st, turn, ch 1
R18: sc across chain row, 1 sc into next st, turn, ch 1
R19: sc across chain row, 2 sc down shell side, turn, ch 1
R20: sc across chain row decreasing twice evenly, 1 sc down shell side, turn, ch 1
R21: sc across chain row decreasing once in the middle, 2 sc down shell side, turn (do not ch 1)
R22: sc across chain row decreasing once, 1 sc on side of shell
Connect chain row to the shell by matching stitches between the two rows
(you may need to sc2tog once or twice)
 |
| front of shell |
 |
| back of shell |
SHOES (make 2):
Start using White and have Pink at the ready, Hook Size E
Work in rows...
Ch 5
R1: sc across (4), turn, ch 2
R2: sc across (5), turn, ch 2
R3: sc across (6), turn, ch 1
R4-R7: sc across, (6), turn, ch 1

Start working in the round...
R8: sl st around (23)
R9: sl st in front loops only (23) sl st into first st on this round. F.O.
Starting 1/2 way on one of the longest sides of shoes, attach pink
R10: 10 sc, drop pink and join white , 13 sc (23)
R11: (p/u pink) 1 sc, dec, 4 sc, dec, 1 sc, ( p/u white ) 2 sc, dec, 2 sc, dec, 2 sc, dec, 1 sc (18)
R12: (p/u pink), dec four times, (cut pink and leave tail inside shoe, p/u white ), 2 sc, dec, 2 sc, dec, 2 sc (12)
R13: 12 sc (12)
F.O. & Stuff

EYE CUP:
Using Green and Hook size G
Working in the round...
Magic Circle (6)
R1: 2 sc in each st around (12)
R2: 12 dhc around (12)
F.O. tightly to cup the circle.
Glue 1" googley eye into the eye cup.

ASSEMBLY:
Stuff Shell firmly through eye hole, adjusting firmness with the shape of the shell
Using a good embroidery thread or matching yarn, sew shoes onto the underside of shell
Using a good embroidery thread or matching yarn, sew green eye cup in the hole of the shell
Cut out Dark Brown and Off-White felt in the shape of Marcel's mouth/teeth and sew in place on shell
ALLEN:
Grab a few yarn scraps and tie together with embroidery thread to give Marcel a doggie :)
 |
| "My one regret in life is that I will never have a dog, but sometimes I take a hair and tie it to a piece of lint and drag it around" ~Marcel the Shell (with shoes on) |
Thursday, July 14, 2011
ilomilo crocheted minis
ilomilo is an absolutely adorable puzzle game the kids have found a demo for on the xbox. The world is winsome. The music is delightful. The main characters are altogether sweet. Even the purpose of the game - two best friends trying to find each other because they are happiest together - is endearing!

Awwwwwwwwww! Just look at them...ADORABLE!!!!!
My children kindly requested a plushy version of ilo and milo and, well, they were too just too darn cute not to try. Here is my mini version, about 3 inches high (not including antenna)
Hook sizes G & E
ww yarn in blue or red, and cream
brown or black pipe cleaner
cream felt
cream embroidery thread
embroidery needle
yarn needle
fiber fill
ilomilo BODY - Hook G, red or blue yarn
Magic Circle 6
R1: 2 sc in ea st (12)
R2: *sc, 2 sc in next st* around (18)
R3 - R12: sc around (18 ea)
F.O. and leave a long tail
Make face out of felt, use markers to make eyes. Sew onto ilomilo body.
Insert pipe cleaner up through body and through magic circle middle. After pulling through as much length out the top as you'd need to give him a cute curly, trim the pipe cleaner so you will have an inch more length out the bottom.

Using the yarn needle, pull the yarn from the side you F.O. to the opposite side and through a stitch. Use this as a podium for the pipe cleaner to wrap around.

 Stuff with fiber fill. Try to put 1/2 the stuffing behind and in front of the pipe cleaner so it stays near the middle. Whip stitch closed.


ilo milo ARMS & LEGS - Hook E with cream yarn
make 4
Magic Circle 5
R1: sc around (5)
R2: sc around (5)
F.O. with tail
 Using a yarn needle, sew onto body and weave in.

Of course, you cannot make one without the other so here they are...together again:
Awwwwwwwwww! Just look at them...ADORABLE!!!!!
My children kindly requested a plushy version of ilo and milo and, well, they were too just too darn cute not to try. Here is my mini version, about 3 inches high (not including antenna)
Hook sizes G & E
ww yarn in blue or red, and cream
brown or black pipe cleaner
cream felt
cream embroidery thread
embroidery needle
yarn needle
fiber fill
ilomilo BODY - Hook G, red or blue yarn
Magic Circle 6
R1: 2 sc in ea st (12)
R2: *sc, 2 sc in next st* around (18)
R3 - R12: sc around (18 ea)
F.O. and leave a long tail
Make face out of felt, use markers to make eyes. Sew onto ilomilo body.
 |
| make one eye slightly bigger than the other |

Using the yarn needle, pull the yarn from the side you F.O. to the opposite side and through a stitch. Use this as a podium for the pipe cleaner to wrap around.


ilo milo ARMS & LEGS - Hook E with cream yarn
make 4
Magic Circle 5
R1: sc around (5)
R2: sc around (5)
F.O. with tail


Of course, you cannot make one without the other so here they are...together again:
 | |
| ilo is red, milo is blue |
Tuesday, July 12, 2011
Elmo (tickle at your own risk)
A couple Wednesdays ago I flashed a pair of red legs at my blogger readers wondering if they could guess who I was going to attach them to. I got one reader (thanks, Mom) to respond to me in person with a correct guess: ELMO!
Our adorable neighbor girl is turning 2 and needed an Elmo, so she shall have an Elmo!

Elmo is ready to be tickled and squeezed and loved (and hopefully dragged all around the house).
 My favorite part of Elmo is his big orange nose and his slightly cross-eyed gaze. It just makes me smile. And isn't that precisely Elmo's sole purpose: to make you smile ☺☺☺☺☺☺☺
Either that or completely annoy you with his laugh, I suppose. Heheh.
Elmo did a quick bit of online research and did find this very scientific correlation chart he'd like to share with you:
........☑ ☐ ☐ ☐ ☐ ☐ ☐ ☐
........☑ ☑ ☐ ☐ ☐ ☐ ☐ ☐
........☑ ☑ ☐ ☑ ☐ ☐ ☐ ☐
........☑ ☑ ☐ ☑ ☑ ☐ ☐ ☐
........☑ ☑ ☐ ☑ ☑ ☑ ☐ ☐
........☑ ☑ ☐ ☑ ☑ ☑ ☑ ☐
Age: 1 5 10 15 20 25 30 35+
Each ☑ is equal to one "I love Elmo" unit.
Note that at the tender ages of 1 - 5 the love for Elmo is high. As age increases, there seems to be a direct correlation to the decline of Elmo love. This makes sense because as you get older, you have heard Elmo laugh so many times you think that you'll go bonkers if you hear it one more time. The only reason you have any "I love Elmo" units at all for Sesame Street's most famous character is that you have little ones, or know little ones, who are crazy about him. During this time you endure that manical laugh on their behalf. But by the time your kids are outside of the 1-5 range, adults over 35 find that they have no love lost for the furry red monster.
The only exception is the 6-14 range who think they are altogether too cool for "baby shows."
The resurgance of Elmo love units at 15 matches up with the inexplicible desire to wear pig tails, string a binkie around the neck, and carry a bottle full of kool-aid. Again, this is a mystery. But what about the ages 14 and 15 isn't a mystery? Look that one up, Mr. Elmo.
This Elmo pattern was created by A Crochet Ninja and can be found here. I thought it was a really great pattern, clear and well written. I only reduced the rows for the black mouth to match the number of stitches I had at my mouth gap. You can find Cookie Monster there, too (which I may have to make for my husband one day...)
Our adorable neighbor girl is turning 2 and needed an Elmo, so she shall have an Elmo!

Elmo is ready to be tickled and squeezed and loved (and hopefully dragged all around the house).

Either that or completely annoy you with his laugh, I suppose. Heheh.
Elmo did a quick bit of online research and did find this very scientific correlation chart he'd like to share with you:
........☑ ☐ ☐ ☐ ☐ ☐ ☐ ☐
........☑ ☑ ☐ ☐ ☐ ☐ ☐ ☐
........☑ ☑ ☐ ☑ ☐ ☐ ☐ ☐
........☑ ☑ ☐ ☑ ☑ ☐ ☐ ☐
........☑ ☑ ☐ ☑ ☑ ☑ ☐ ☐
........☑ ☑ ☐ ☑ ☑ ☑ ☑ ☐
Age: 1 5 10 15 20 25 30 35+
Each ☑ is equal to one "I love Elmo" unit.
Note that at the tender ages of 1 - 5 the love for Elmo is high. As age increases, there seems to be a direct correlation to the decline of Elmo love. This makes sense because as you get older, you have heard Elmo laugh so many times you think that you'll go bonkers if you hear it one more time. The only reason you have any "I love Elmo" units at all for Sesame Street's most famous character is that you have little ones, or know little ones, who are crazy about him. During this time you endure that manical laugh on their behalf. But by the time your kids are outside of the 1-5 range, adults over 35 find that they have no love lost for the furry red monster.
The only exception is the 6-14 range who think they are altogether too cool for "baby shows."
The resurgance of Elmo love units at 15 matches up with the inexplicible desire to wear pig tails, string a binkie around the neck, and carry a bottle full of kool-aid. Again, this is a mystery. But what about the ages 14 and 15 isn't a mystery? Look that one up, Mr. Elmo.
 |
| Elmo, doing some online research |
This Elmo pattern was created by A Crochet Ninja and can be found here. I thought it was a really great pattern, clear and well written. I only reduced the rows for the black mouth to match the number of stitches I had at my mouth gap. You can find Cookie Monster there, too (which I may have to make for my husband one day...)
Thursday, June 16, 2011
Sonic the Hedgehog
One thing that amazes me about my three children is just how different they are from each other. They may share the same squinty eyes, freckles and long piano playing fingers but their preference in food, say, just highlights my point. For instance, my first born loves spicy meat: pepperoni, sausage and tacos. My girl has a sweet tooth and would prefer hot tea (cream & sugar, please) with graham crackers. My youngest would eat peanut butter and honey sandwiches morning, noon and night.
I love to find that their differences show up in their play as well. My eldest is fairly well-rounded: he loves riding his bike, writing stories, playing sports and video games. My girl is a bit more focused: it's all about animals with her, but any and all animals will do. My youngest, however, is even more singular. When he likes something, it is utterly and completely exclusive. He has gone through a few phases in his life. First there were cars. This phase started with chubby cars his little fingers could maneuver and grew to the smaller hot wheels and finally the Disney Pixar Cars.
Then came Mario. Oh, Super Mario! With his dazzling invincibility star and awesome fire power, this character bordered on obsession with him. The games were just the first of it. Soon after he was dressing like Super Mario, overalls, mustache, gloves and all. Then it was the figurines and plushies that thankfully coincided with the retail Mario craze so many things were purchased at birthday and holiday times. But his focused fixation changed this past year.
It's not Mario anymore. It's Sonic. Move over Nintendo, Sega is taking over. But, alas, I have found that either we are ahead of the craze or the Sonic thing is just not going to make as big a splash with retail. What's a Mom to do when birthdays are coming and there is nary a Sonic to be found? Peruse the web and land on Wolfdreamer's website, of course! She is amazing. If you haven't happened upon her website, you must stop everything and go here now. The woman is a magician with amigurumi. The things she has created from scratch and put up for free almost single-handedly inspired my blog. She is a perfectionist and her capabilities seemingly have no end. Just check out her pattern list. It is nothing short of incredible. It is in her wealth of creativity I have often found solace to my restless hook hand when I need a character to crochet. It is here I found Sonic the Hedgehog.


Crocheting the pieces was simple enough with her easy to follow patterns. Putting the 24 seperate pieces together was what took the majority of my time and energy. I followed her tips and made sure to pin first. Then there was the repositioning and repining and looking at it for days at a time until I couldn't stand it any longer and finally decided to start stitching. I was quite pleased with the end result! My only tiny addition were the buckles for his shoes that are chain stitches sewed onto the shoes in a rectangular shape over the white stripe.

My baby got his Sonic on his birthday and his face let me know that I had done well. He now sleeps with his store bought Mario plushie and his mommy-made Sonic, one in each arm reminiscent of Andy with Woody and Buzz. I wonder what the two rivals do when he's off to school and they are left on his pillow?
 |
| You got it ace, let's race! |
Sunday, June 5, 2011
Yoshi
A couple of months ago, I was commissioned to make a dark blue Yoshi. I ☺adore☺ Yoshi. Those of you who grew up playing Super Mario Bros, as I did, will likely understand. The faithful little riding buddy to our hero plumber, Mario, Yoshi was a great addition to the series. He makes the cutest noises during game play. I can't help but smile when he gulps down the Yoshi fruit. I love how on all the Yoshi levels the trees dance. His hovering power is rather useful and seeing his little legs run in the air makes me happy. He's just a great character!
I set out to accomplish this challenge with eyes wide open - it was to be my first multi-pieced character (as opposed to the one-piece amigurumi style). Most of Yoshi is amigurumi, but with over a dozen pieces to connect it felt a bit like a jigsaw puzzle where the right location for each pieces kept evading me. But I preserved and after several days of looking at him at different angles with pieces pinned, adjusting and looking some more, readjusting and looking some more, I finally made the plunge and sewed him together. I was pleased with the end result. It was, indeed, a labor of love and I couldn't give him away with stealing a few hugs and quality time with Yoshi all assembled. Also a photo shoot was necessary.

Most of Yoshi came from an amazing pattern from robotrish. If you need to make a Yoshi, check out the pattern here. I made a few adjustments according to what I preferred Yoshi to look like. You are welcome to use them if you like them, but you have to hit up robotrish's website for her entire pattern.
Using the same hook size you started with...
Tummy/Lower mouth (white)
R1: sc across (3), ch 2
R2: sc across (4), ch2
R3: sc across (5), ch 3
R4: sc across (7), ch 3
R5: sc across (9), ch 2
R6: sc across (10), ch 2
R7: sc across (11)
R8-R17: sc across (11)
R18: sc across (11), ch 2
R19: sc across (12), ch 2
R20: sc across (13)
R21: sc across (13), ch 2
R22: sc across (14), ch 2
R23: sc across (15)
R24: sc2tog, 10 sc, sc2tog (12)
R25: sc across (12)
R26: sc2tog8 sc, sc2tog (10)
R27: sc across (10)
R28: sc2tog, 6 sc, sc2tog (8)
R29: sc across (8)
R30: sl st, 6 sc, sl st (8)
sl st all the way around
F.O. and weave ends
Assembly tip: Attach securely to body piece leaving the bottom "lip" of mouth loose like he's gonna gobble up a yoshi tree fruit. Use rose colored chalk to color in the inside of the mouth for his tongue.
Check Spots - make 2 (white)
Rnd 1: 2 sc in each st (12)
Rnd 2: *sc, 2 sc in next st* around (18)
Rnd 3: *2 sc, 2 sc in next st* five times only (20)
F.O. and weave ends
Sitting down this Yoshi measure about 11" in height.
I set out to accomplish this challenge with eyes wide open - it was to be my first multi-pieced character (as opposed to the one-piece amigurumi style). Most of Yoshi is amigurumi, but with over a dozen pieces to connect it felt a bit like a jigsaw puzzle where the right location for each pieces kept evading me. But I preserved and after several days of looking at him at different angles with pieces pinned, adjusting and looking some more, readjusting and looking some more, I finally made the plunge and sewed him together. I was pleased with the end result. It was, indeed, a labor of love and I couldn't give him away with stealing a few hugs and quality time with Yoshi all assembled. Also a photo shoot was necessary.

Most of Yoshi came from an amazing pattern from robotrish. If you need to make a Yoshi, check out the pattern here. I made a few adjustments according to what I preferred Yoshi to look like. You are welcome to use them if you like them, but you have to hit up robotrish's website for her entire pattern.
Using the same hook size you started with...
Tummy/Lower mouth (white)
I liked the look of horizontal stripes down Yoshi's tummy, so this part is done in short rows. Be sure to ch 1 at the end of your rows (unless otherwise noted as the first few rows), turn, and start your next row in the second ch from hook
Ch 4R1: sc across (3), ch 2
R2: sc across (4), ch2
R3: sc across (5), ch 3
R4: sc across (7), ch 3
R5: sc across (9), ch 2
R6: sc across (10), ch 2
R7: sc across (11)
R8-R17: sc across (11)
R18: sc across (11), ch 2
R19: sc across (12), ch 2
R20: sc across (13)
R21: sc across (13), ch 2
R22: sc across (14), ch 2
R23: sc across (15)
R24: sc2tog, 10 sc, sc2tog (12)
R25: sc across (12)
R26: sc2tog8 sc, sc2tog (10)
| I love his big nose! |
R28: sc2tog, 6 sc, sc2tog (8)
R29: sc across (8)
R30: sl st, 6 sc, sl st (8)
sl st all the way around
F.O. and weave ends
Assembly tip: Attach securely to body piece leaving the bottom "lip" of mouth loose like he's gonna gobble up a yoshi tree fruit. Use rose colored chalk to color in the inside of the mouth for his tongue.
Check Spots - make 2 (white)
I preferred flat cheeks that were slightly larger around. This section is done in the round.
Magic Circle (6)Rnd 1: 2 sc in each st (12)
Rnd 2: *sc, 2 sc in next st* around (18)
Rnd 3: *2 sc, 2 sc in next st* five times only (20)
F.O. and weave ends
Assembly tip: Match up "flat side" of circle to mouth/tummy strip and sew on.
Boots - make 2 (start with light brown)
I wanted a two-toned shoe and chose a rounder shape over the fold over boot. This is done in the round.
Magic Circle (6)
Rnd 1: 2 sc in each st (12)
Rnd 2: *sc, 2 sc in next st* around (18)
Rnd 3: sc around (18)
**Change to darker brown color**
Rnd 4: sc back loops only around (18)
Rnd 5: *2 sc, 2 sc in next st* four times, 6 sc (22)
Rnd 6: *3 sc, 2 sc in next st* four times, 6 sc (26)
Assembly tip: Insert small cardboard circle to make the bottom of shoe "flat"
Rnd 7: 26 sc (26)
Rnd 8: 3 sc, sc2tog, *sc, sc2tog* around (18)
Rnd 9: 3 sc, sc2tog, *sc, sc2tog* around (12)
F.O. and weave ends
Assembly tip: match up 12 st of boot to the 12 leg st and crochet together with dark brown
Saddle
R4: (switch to white yarn) sc around front posts tightly (creates a bit of texture and bump in saddle. F.O.
Finish Yoshi following robotrish's assembly directions and you'll have an☺adorable☺ Yoshi of your very own!
Following robotrish's pattern up to R3 then my changes made it a slightly larger saddle...
R3: (still using red yarn) ch 1 and sc in same st as sl st, sc around adding 22 in the middle of rows and around edges. F.O. R4: (switch to white yarn) sc around front posts tightly (creates a bit of texture and bump in saddle. F.O.
Finish Yoshi following robotrish's assembly directions and you'll have an☺adorable☺ Yoshi of your very own!
 |
| photos courtesy of www.timdenison.com |
Tuesday, May 31, 2011
Ben 10: the OMNITRIX
 My first born has rediscovered his love of the Ben 10 cartoon (NOT Ben 10: Alien Force, but the original, he's quick to point out). A few years back in Colorado, his bestie and he often pretended they were Fourarms or Diamondhead or XLR8 or Upgrade or...whatever the other six are. And then he got his very own Omnitrix. It was very cool. It had a dot matrix screen with games that he would play and made all sorts of sounds. But somewhere in the move, the watch got lost. We did a little research online and for a pretty penny he could once again own an Omnitrix like the one he had.
 After the discovery that purchasing a new omnitrix was out of his budget he posed a question to me: "Could you make me a crocheted one, Mom?" I thought of how the watch was all sleek and electric and I reminded him that even if I could make one, it wouldn't be as "cool" as the original. He thought about that and decided that even though it wouldn't make sounds or move, it would be worth it. I told him I'd think it though.
Always eager for a new challenge, I took this one on in secret, just in case it didn't work out. I thought that the watch band would be simple enough, but creating the watch face may be tricky. After a few prototypes, I settled on a style I thought would work best.

I had the 2 pieces figured out but I wanted to make it really "work." Ben twists the watch face and then slams down on it to make him change into an alien. I know crochet isn't known for it's movable parts, but I thought a low tech version of a rotating face could be easily achieved by adding two small risers under the face and threading some matching yarn through the face, risers, and onto the underside of the band (not too tightly).
I admit, I was pleased with the results.
But would my boy think it was okay? ☺Yes, yes he did!☺

 |
| The side-by-side comparison |
You can see that I should have made the watch band thicker. I did adjust this in the next two I made because, of course, sister and brother needed one, too (the pattern I'll post below has the thicker band)
So here it is: Ben 10's Crocheted Omnitrix
WW yarn in Lime, grey, black, white
Size F Hook
Embroidery needle, thread
1-Large Black Button, 1-lime or yellow bead, 4-lime or yellow sequins
Watch Band (in Black)
Unless otherwise noted, always ch 1 before the turn at the end of a row and insert into second ch from hook upon starting a new row
Ch 7
R1: 6 sc, ch 2
R2: 7 sc, ch 2
R3: 8 sc
R4 - R30: 8 sc **this part can be adjusted smaller/bigger to fit wrist by adding or subtracting rows**
Beginning large button hole...
R31: 4 sc, ch 1, turn
R32: 4 sc, ch 1, turn
R33: 4 sc, ch 1, turn
R34: 4 sc, ch 1, turn
R35: 4 sc, F.O.
Go back to R30 and attach black yarn onto short side and work up as a matching side...
R31: 4 sc, ch 1, turn
R32: 4 sc, ch 1, turn
R33: 4 sc, ch 1, turn
R34: 4 sc, ch 1, turn
R35: 4 sc
(Optional reinforce button hole row: sl st 10 up and down inside of button hole, F.O.)
Attach black yarn to start R36 and connect R35 halves as the top of a button hole...R36: 8 sc
R37: 8 sc, turn with no ch 1
R38: 6 sc, sl st into last st
sl st around perimeter of watch
In WHITE
Top stitch into the fp of first st of each row and F.O.
Top stitch into the fb of last st of each row and F.O.
This should make 2 parallel white lines up and down the length of the watch band
Omnitrix Watch Face (start with Lime)
I will indicate each ch and row turn on this section just for added clarification This section starts with the lime hourglass shape
Ch 7, turn
R1: sc across (6), ch 1, turn
R2: sk first st, sc across (6), turn
R3: sk first st, sc across (5), turn
R4: sk first st, sc across (4), turn
R5: sk first st, sc across (3), turn
R6: sk first st, sc across (2), turn
R7: sk first st, sc across (1), ch 2, turn
R8: (insert into second ch from hook) 1 sc, ch 2, turn
R9: (insert into second ch from hook) 2 sc, ch 2, turn
R10: (insert into second ch from hook) 3 sc, ch 2, turn
R11: (insert into second ch from hook) 4 sc, ch 2, turn
R12: (insert into second ch from hook) 5 sc, ch 2, turn
R13: (insert into second ch from hook) 6 sc, ch 1, turn
R14: (insert into second ch from hook) 6 sl st
Draw up grey yarn through the lime loop left on hook. Turn hourglass on it's side and begin working evenly into the row sides
greyR1: sk first row, 9 sc (four down one side, one at the thinnest point of the hourglass and four up the other side), sk last row, ch 1
greyR2: sk first st, sc, dc, htr, tr, htr, dc, sc, sk last st, sl st into that first grey connecting st
Repeat these two rows on the other side of the hourglass, stretching it to take a circular shape as you go
blackRnd1: Attach black anywhere on the circumference and sc evenly around.
Highlight hourglass by using needle and yarn to outline the hourglass with black yarn.
Add 4 sequins at 12 o'clock, 3 o'clock, 6 o'clock and 9 o'clock with sewing thread and needle.
Risers (make 2 in black)
Magic Circle (6)
Rnd 1: 2 sc in ea st (12)
Rnd 2: *2 sc in next st, sc* around (18)
F.O. and leave long tail of yarn
Whip stitch together and secure to the middle of watch. With a piece of lime yarn, thread the omnitrix face through the center of the hourglass, down through the risers and watch band and gently secure on the underside of band. The tension on this shouldn't be too tight so the face can be turned for "realistic" play :)
Once the face is attached, sew the bead onto the band just under the edge of the omnitrix (at 6 o'clock). When the watch is on a wrist, it will show.
Add the large black button to the side of watch opposite the button hole. The yarn will stretch a bit, so make it nice and snug to start with.
 |
| Action Shot |
Monday, May 16, 2011
Skateboard for your Puffle
After making the black puffles for my kids, they hinted that skateboarding is what makes their new pets the most happy. They also just happened to mention that as good puffle owners, they needed to provide said entertainment for them. I obliged.
This simple pattern will take you 15 minutes at most and is worked in rows. Note that you will always start the new row in the second ch from hook unless otherwise noted.
G Hook
WW yarn
4 large plastic beads (for the wheels)
Ch 22
Row 1: 21 sc, ch 2, turn
Row 2: 22 sc, ch 2, turn
Row 3: 23 sc, ch 1, turn
Row 4: 23 sc, ch 1, turn
Row 5: 23 sc, ch 1 turn
Row 6: sctog2, 19 sc, sctog2, ch 1, turn
Row 7: 19 sc, sctog2, ch 1 turn
Row 8: sl st 20 across
Continue to sl st around the rest of the circumference (8 sl st on short side, 21 sl st on foundation ch, 9 sl st on short side)
Sl st into last ch of Row 7
F.O. & Weave ends
The board should be slightly concave after the sl st "oval" is complete. Find the bottom of board and position the 4 bead "wheels" using yarn or embroidery thread to secure them to skateboard. Weave ends.
Voila! One perfect fitting skateboard for the puffle pattern I posted!
Variation: Don't put beads on and you have a snowboard ;)


Sunday, May 15, 2011
Chocolate Chip Cookies
Nom-Nom....

Puffles love cookies! And what child's tea party is complete without a batch of these cute, crumb-free munchies? They are super quick & easy and guilt-free with 0 calories :)


As with all amigurumi, these cookies are worked in rounds

G Hook
A small amount of tan yarn (cookie rounds)
A tiny amount of darker brown (chips)
Yarn Needle
Cookie (make 2)
Magic Circle (5)
Rnd 1: 2 sc in each st around (10)
Rnd 2: *sc 1, 2 sc in next st* 5 times (15)
Rnd 3: *sc 2, 2 sc in next st* 5 times (20)
Rnd 4: *sc 3, 2 sc in next st* 5 times (25)
Rnd 5: sc 25
Use darker brown and make chips on one (or both) sides.
Place both cookies with wrong sides together and whip stitch the edges together. No stuffing necessary.
P.S. I felt the need for rainbow chips for this batch! I love variety. Perhaps I'll make frosted cookies one day soon...
Subscribe to:
Posts (Atom)